Installation Manual
Installation summary
You can find general information, technical description and deployment considerations about Excalibur components in deployment documentation.
Excalibur Enterprise installation process:
- Excalibur Server installation (required)
- Excalibur Facade installation (required)
- Excalibur Dashboard administrator registration (required)
- Excalibur Client(s) registration (optional)
- Excalibur TRESK installation (optional)
Content of deployment package
-
 excalibur-<customer>-<version>.zip*
-
 Server - installation files for Excalibur Server component
 - Facade - installation binaries for Excalibur Facade component
- excalibur-ad-facade-<version>-x64-<customer>-<type>.msi
- Client - installation binaries for Excalibur Client component
- excalibur-client-<version>-x86-<customer>-<type>.msi
- excalibur-client-<version>-x64-<customer>-<type>.msi
-
Excalibur Server installation
Requirements
- Single-node deployment - consists of one node with full service stack.
primary | ||
|---|---|---|
| CPU cores | 8 | |
| RAM (min.) | 8GB | |
| Disk space (min.) | 100GB | |
| OS (recomended) | Latest Ubuntu LTS Latest RHEL (min. Maintenance Support) | |
| Docker (recomended) | Latest | |
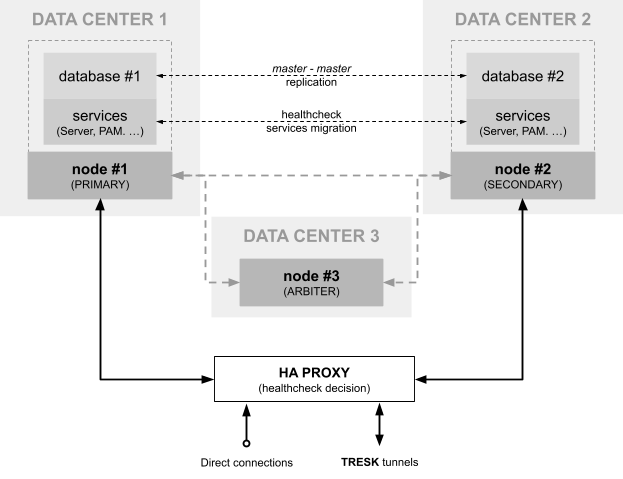
- High Availability deployment - consists of a cluster of at least 3 nodes. Where a pair of nodes (primary, secondary) take over the role of execution and control nodes, the other node (arbiter) is used only for the management of the swarm services.
primary, secondary | arbiter | |
|---|---|---|
| CPU cores | 8 | 2 |
| RAM (min.) | 8GB | 4GB |
| Disk space (min.) | 100GB | 20GB |
| OS (recomended) | Latest Ubuntu LTS Latest RHEL (min. Maintenance Support) | |
| Docker (recomended) | Latest | |
Docker installation
Installation instructions for Ubuntu and RHEL can be found in the Docker documentation. The documentation contains all the necessary information about the currently supported operating systems.
Installation package content
 config/ - directory with application configuration/customization
- certificates
- push - push messages certificates/keys
- ssl - placeholder directory for TLS certificates
- xclbr - certificates for Excalibur components
- conf.d - granulated main configuration (optional)
 excalibur.json - server`s main configuration file
- logger.json - server`s logger configuration file
- mongodb.json - storage service configuration
- db_root_password - root/failover password for database(s)
- logo.png - company logo
- push.yml - push messages (gorush) configuration file
 excalibur.sh - main installation and maintenance script
- excalibur-stack.yml - Excalibur Server service definition
- excalibur-stack-ha.yml - HA extra stack configuration (HA variant)
- excalibur-stack-logging.yml - Syslog/Siem logging extra options (optional)
Important
Do not remove config/ directory or any .yml file during or after installation process. Those files are crucial for correct startup and running of Excalibur Server services.
Installation with two phases
-
First phase (-o) consist of Docker swarm initialization and appropriate certificate generation, but no docker deploy is done.
./excalibur.sh install -o -r primary -
After that phase there is a space for (TLS) certification fine-tuning. You can swap temporary/self-signed one's (automatically generated during first phase) with ones issued by real CA. To completely finish installation run main scrip again but now with update action.
./excalibur.sh update -r
Installation steps - single node variant
Copy the installation package to the server and unpackage it. Precondition for all installation steps is that your working directory/path is set to directory where you unpack deployment package.
-
Generate application certificates and create local Docker swarm:
./excalibur.sh install -oNote
After this step, certs/ directory is created which contains all certificates and cryptography files.
-
Update TLS/SSL (Dashboard) certificate and private key. (recomended)
cp new_dashboard.crt ./certs/dashboard.crt
cp new_dashboard.key ./certs/dashboard.key
Note
This step is optional but highly recommended. If you decide to do it later, than follow appropriate steps from Administration manual.
-
Adjust main (server) configuration. (optional)
vim ./config/excalibur.jsonNote
You can find full description of configuration options in Administration manual.
-
Deploy (updated) stack configuration into local Docker Swarm:
./excalibur.sh update -l -
Check system status
./excalibur.sh status -
Follow server`s post installation steps
Installation steps - HA variant
Copy the installation package to all nodes on same path and unpackage it. Precondition for all installation steps is that your working directory/path is set to directory where you unpack deployment package.
-
System installation steps on primary node - node #1
-
Generate application certificates and create Docker swarm:
./excalibur.sh install -sor primaryNote
During installation you must provide ip address of node #1 node! Script generates swarm join token for installation on other HA nodes.
-
Update TLS certs. (recomended)
Note
This step is optional but highly recommended. If you decide to do it later, than follow appropriate steps from Administration manual.
-
Deploy (updated) stack configuration into Docker Swarm:
./excalibur.sh update -lsr
-
-
System installation steps on secondary node - node #2
-
Join node into already created swarm as secondary role:
./excalibur.sh install -sr secondaryNote
During installation you must provide ip address of node #1 (primary) node and swarm join token!
-
-
System installation steps on arbiter node - node #3
-
Join node into already created swarm as arbiter role:
./excalibur.sh install -sr arbiterNote
During installation you must provide ip address of node #1 (primary) node and swarm join token!
-
-
Database replication steps on secondary node - node #2
-
Dump database from primary node
./excalibur.sh ha db -D -
Clear excalibur database on secondary node
./excalibur.sh ha db -C -
Apply database dump from primary node
./excalibur.sh ha db -A
-
-
Database replication steps on primary node - node #1
-
Enable database master-master replication
./excalibur.sh ha db -e -
Check MariaDB replication status
# show master status
./excalibur.sh ha db -m

# show secondary status
./excalibur.sh ha db -s
-
-
Recordings storage replication steps on primary node - node #1
-
Enable recordings storage master-master replication
./excalibur.sh ha mongo -r -
Check MongoDB replication status
./excalibur.sh ha mongo -s
-
-
Follow server`s post installation steps
Post-installation steps
-
Very first administrator registration
- Load the Excalibur Dashboard on the browser
- Fill Active Directory username and administrator password to the shown registration form
- Install the mobile app to the administrator's phone Excalibur User Manual.
- Scan the schown registration QR from the Excalibur Dasboard screen and finish the registration
Warning
The registered administrator is automatically the Excalibur system administrator with the highest rights in the Dashboard console.
Additional configuration options
If Docker operates behind proxy update docker service file located at /lib/systemd/system/docker.service and restart docker service.
[Service]
  Environment="HTTPS_PROXY=https://proxy.example.com:443/"
  Environment="NO_PROXY=docker-registry.local"
  .
  .
  .
systemctl restart docker.service
Optional logging - rsyslogd configuration
cat << EOF > /etc/rsyslog.d/excalibur-logger.conf
# provides UDP syslog reception
module(load="imudp")
input(type="imudp" port="514")

# provides TCP syslog reception
module(load="imtcp")
input(type="imtcp" port="514")

if( re_match( $syslogtag, 'excalibur-(proxy|db-primary|db-secondary|mongodb-primary|mongodb-secondary|mongodb-arbiter)') ) then {
  # write to file
  action(type="omfile" file="/var/log/excalibur-system.log")
  stop
}

if( $syslogtag startsWith 'excalibur') then {
  # write to file
  action(type="omfile" file="/var/log/excalibur.log")
  stop
}
EOF
systemctl restart rsylog.service
To store Recordings on custom host location please update volume section in excalibur-stack.yml file.
volumes:
  exc-mongodb-data:
    driver: local
    driver_opts:
      type: none
      o: bind
      device: /my-custom-location
Excalibur Server uninstall
Uninstall - single node variant
-
Uninstall application files, remove application stack and leave Docker Swarm:
./excalibur.sh uninstall
Uninstall - HA variant
-
Uninstall steps on primary node - node #3
-
Uninstall application files on arbiter node and leave Docker Swarm:
./excalibur.sh uninstall
-
-
Uninstall steps on primary node - node #2
-
Uninstall application files on secondary node and leave Docker Swarm:
./excalibur.sh uninstall
-
-
Uninstall steps on primary node - node #1
-
Uninstall application files on primary node, remove application stack and leave Docker Swarm:
./excalibur.sh uninstall
-
Uninstall - manual cleanup (In case of automatic uninstall failure)
-
Uninstall steps are same for all nodes and instalation types
-
Leave Docker Swarm:
docker swarm leave --force -
Clean all volumes, containers, images and networks
docker system prune --all --volumes --force -
Remove remaining persistent storage data or instalation specific files manually from the host file system
-
Excalibur Facade component installation
Requirements
| Excalibur Facade | |
|---|---|
| OS | Microsoft Windows Server 2008 R2 and higher |
| CPU (min.) | 2 GHz |
| RAM (min.) | 2 GB |
| Disk space (min.) | 5 MB |
| Services | gMSA or ADDC |
Note
Used disk space depends on Excalibur Facade usage and debug level.
Important
For further information please see the detailed documentation AD Facade Manual.
Installation steps (gMSA account)
- Install gMSA to the computer, which is domain controller.
- Install AD modul for Windows PowerShell.
- Create a gMSA account on AD.
- Assign the appropriate rights to the created account AD Facade Manual.
- Configure created account to the target computer (AD).
- Install delivered installation package to the AD domain controller.
Note
Installation via Active Directory Domain Controller (ADDC) is recommended, as this simplifies the installation and subsequent updates of the component.
Excalibur Client component installation
Requirements
| x86 | x64 | |
|---|---|---|
| OS (min.) | Windows 7 (SP1) x86 | Windows 7 (SP1) x64 |
| RAM (min.) | 1 GB | 2 GB |
| Disk space (min.) | 20 MB | 20 MB |
| Software | Internet Explorer 9 and higher | |
Note
Used disk space depends on Excalibur Client usage and debug level.
Important
For further information please see the detailed documentation Client Manual.
Installation steps
- Run the supplied msi installation package
- Follow the instructions of the installation program
- Start using Excalibur Client after logout current session.
Note
After successful installation it is recommended to perform online login to test Excalibur Client functionality and to generate offline tokens for future OTP logins
Important
Excalibur Client can be fully installed using automated tools.
Excalibur TRESK component installation
Overview
Requirements
| Excalibur TRESK-VM | |
|---|---|
| OS | Ubuntu |
| CPU (min.) | 2 GHz |
| RAM (min.) | 2 GB |
| Disk space (min.) | 10 GB |
| Services | Docker |
Installation steps
- Generate run script
- Execute run script on TRESK-VM
- ...
Further materials
Excalibur Administrattor Dashboard Manual