Excalibur Whitepaper
Glossary
| Term | Definition |
|---|---|
| Manager | Manager is the user's direct superior. |
| Peer | Peers are co-workers who share the same manager as the user. |
| Company | Company is an organization / entity / unit of organizational structure common for a group of users. |
| User | User is the end-user which is using Excalibur to Authenticate, Authorize, Verify etc. |
| Account | Account is a set of credentials (username, password) used to authenticate the User. |
| Token | Token is the smartphone with Excalibur mobile application installed. |
| Client | Client is any end-point where the User logs into utilizing the Token. |
| Facade | Facade is Active Directory (AD) integration component. |
| Server | Server provides a persistent network & storage central point. |
| CA | Cloud-based Excalibur Certificate Authority. |
| Intermediate CA | Each Excalibur Server acts as an Intermediate CA for issuing certificates to its Clients and Tokens. |
| Dashboard | Dashboard is a web-based management interface for Excalibur. |
| Factor | Factor is a method of authentication, such as fingerprint, PIN, face recognition etc. |
| Policy | Policy is a set of rules specified for an action performed by Excalibur User which needs to be fulfilled to allow the action. |
| Intent | Intent is a DB entry which represents an action performed by Excalibur User. |
| OTP | One-time password. |
| mTLS | Mutually authenticated TLS. |
| CSR | Certificate Signing Request. |
| AD | Active Directory. |
| ADDC | Active Directory Domain Controller. |
| gMSA | Group Managed Service Account. |
| SAML | Security Assertion Markup Language. |
| ADFS | Active Directory Federation Services. |
| LDAP | Lightweight Directory Access Protocol. |
| Crypto-parts | Crypto-parts are parts of account password which are stored separately on different components and are used to generate the password when needed which is product of XOR operation of the two. |
Introduction
Excalibur utilizes the user’s smartphone to act as a secure hardware token for any and all authentication and authorization needs.
The ultimate goal is to move all forms of authentication and authorization away from passwords, replace them seamlessly with smartphone-based strong but user friendly multi-factor authentication. Excalibur's unique value is in providing backward compatibility with all the applications, Operating Systems (OS) and services used today thus creating a bridge between the password-based present and password-less future.
One of the core innovations of Excalibur is its ability to defeat all attacks on credentials as Excalibur is able to automatically change a password on each login. In the Excalibur user flow – the password is no longer entered by the user – the user never even knows the password, it is just a random string used in the background, seamlessly injected into the login process by Excalibur. The user instead just interacts with the smartphone – using it to provide various authentication factors as required by the defined security policy. In case user needs to know his current password for any reason, he can use the 'Show Password' feature in the Excalibur application. This feature will display their current password after providing the required authentication factors.
Clearly for such a scheme to work - compatibility is the decisive factor. Excalibur supports all major platforms and authentication protocols – yet there always might be some legacy apps that require custom integration. To deal with such situations and allow for a gradual rollout - Excalibur supports on-demand displaying of a randomly generated password after successful authentication. This means even if there are systems not supported by Excalibur, the user will just need to retype a OTP password which will be changed after use.
There are several ways how Excalibur is able to handle on-boarding, either via sending a registration QR via email or if password based authentication is still used self-registration can be performed.
During self-registration, the user is asked to provide the current password. This password is used for a purpose of authenticating the user – at the moment when initialization is performed – the user is still using password based authentication. Passwords are verified – and changed automatically.
Excalibur Design
Excalibur was designed to overcome limitations of existing authentication systems, core design elements can be summarized as:
-
Straightforward user experience with no room for error or the possibility for the user to delegate access – eliminating human element weaknesses and exploitation attacks such as social-engineering or phishing.
-
Elimination of passwords as means of User authentication – thus no more passwords to remember.
-
Replacing static passwords with a distributed PKI scheme – passwords are still utilized on background to provide legacy compatibility with all the password-based systems used today but can be dynamically changed on each use thus degrading their security value to one-time passwords, thus no more passwords to steal / reuse.
-
Physical security and peer-verification – by “freeing” authentication from passwords, unique novel authentication / authorization flows are possible – colleagues / managers are able to verify directly from their mobile phone that you are really you instead of having to wait for IT Security to react in case of any security incident / policy violation thus allowing for stricter policies, yet dynamically adjusting to real life needs.
-
Avoiding a single point of failure – the system must be fail-safe from both reliability and security perspectives even in worst case situations.
- Reliability perspective – Users must always be able to login in any online or offline situation even if any / all Excalibur components fail.
- Security perspective – even if any single Excalibur component is fully compromised, the system function must not be affected, this is accomplished by distributed storage of credentials (an XOR random scheme, protecting data at rest) and a distributed PKI scheme providing means to verify authenticity of each action and event in a distributed manner, where every action has to be signed and verified by multiple separate components - meaning that even if Excalibur Server would be totally compromised attacker would not be able to gain access to any Client or impersonate any Token. (security assumptions apply - Facade is isolated, connects to server via a defined / intentionally limited protocol; to attack AD thru Facade would require control over Server and exploiting the protocol between Facade and Server, current scheme is not designed to provide any security guarantees if more than one component of the scheme is compromised at the same time)
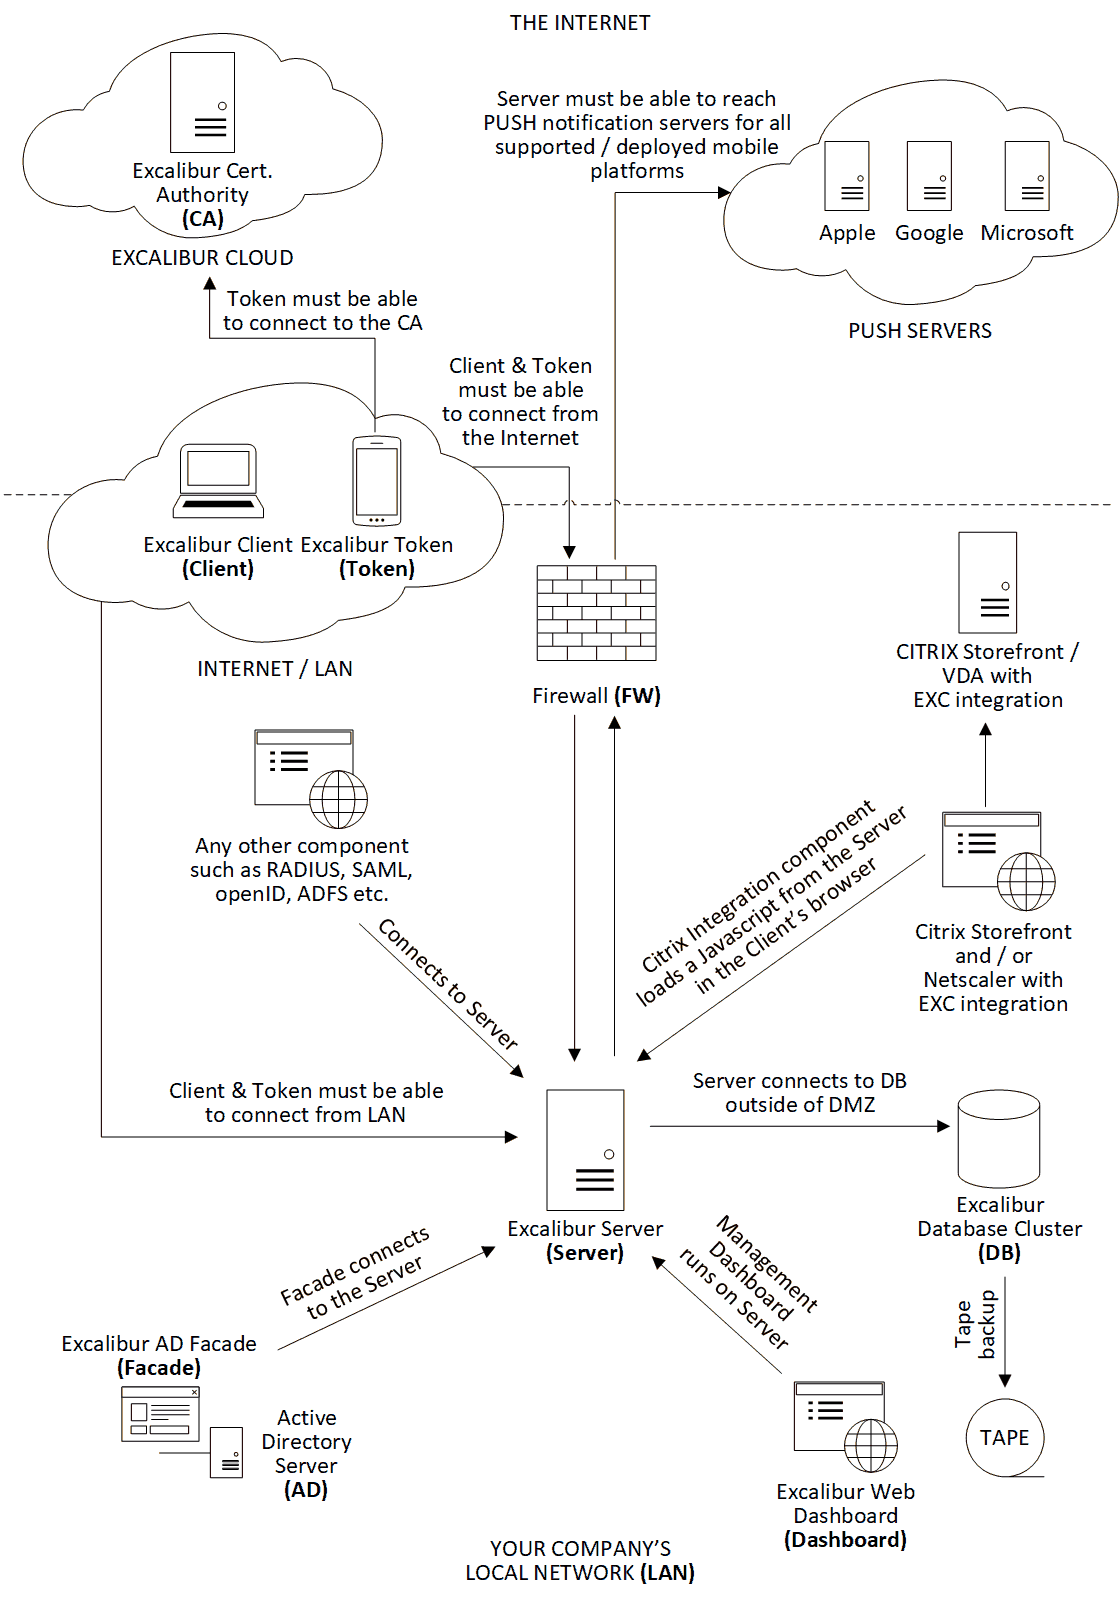
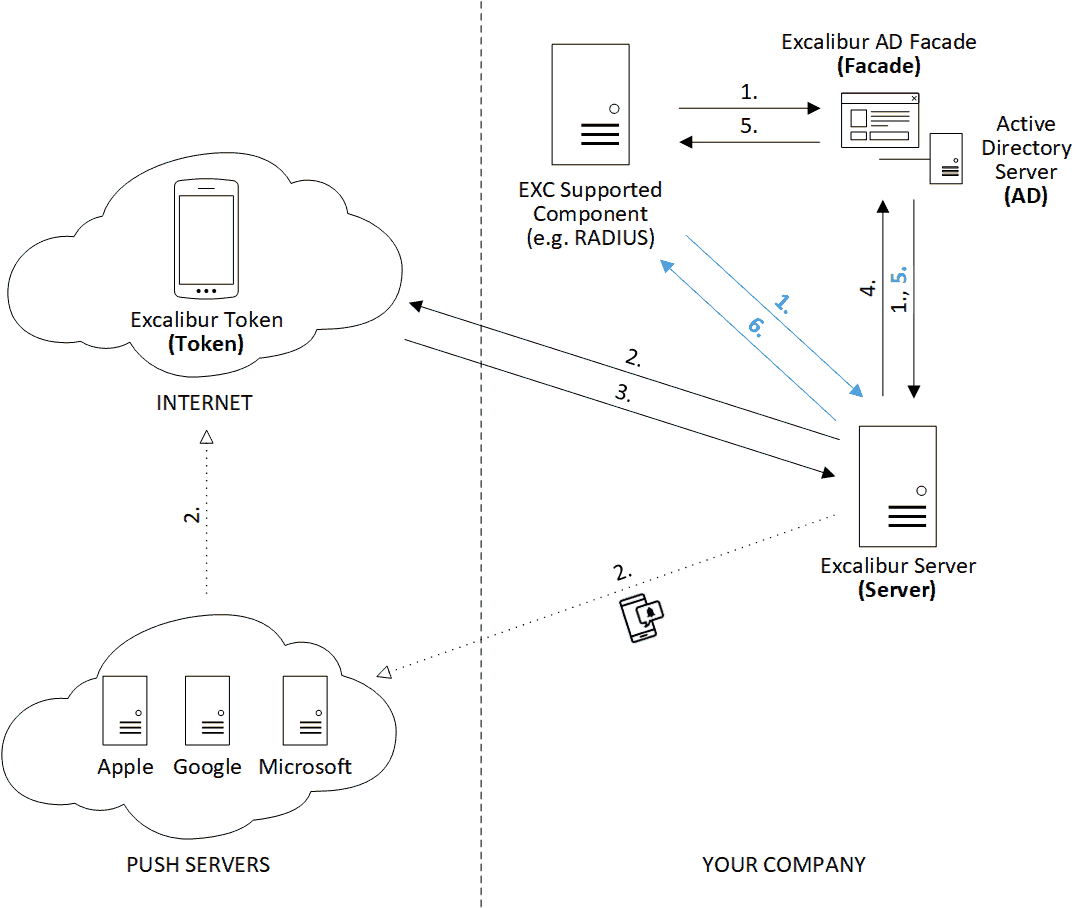
Excalibur Components
- CA - Excalibur Certificate Authority issues certificates to other Excalibur components, for security reasons - Excalibur provides CA as a high available cloud service with automatic failover. Excalibur CA is used also for licensing purposes thus cannot be deployed on-premise.
- Server - provides a persistent network & storage central point, must be reachable by all components, also provides the Management Interface - Dashboard. In Excalibur scheme server acts as a Intermediate CA for issuing certificates to Clients and Tokens.
- Token - Excalibur uses the smartphone as a security token, that is why we call the smartphone with Excalibur application the Excalibur Token. It is used for interaction with the User - entering authentication factors, showing session history and providing capability to remotely lock / terminate active sessions. Excalibur Token utilizes phone-based biometry and hardware-backed secure element whenever possible.
- Client - in the context of Excalibur - Client is any end-point where the User logs into utilizing the Token.
- Facade - Active Directory (AD) integration component, which integrates with AD via Microsoft Directory Replication Service Remote Protocol (MS-DRSR) with fallback to LDAP v3. This component must be installed on at least one Active Directory Domain Controller (ADDC), running under system service or on any Microsoft Windows server joined to domain under group Managed Service Account (gMSA) with sufficient privileges.
Excalibur Topology for On-premise deployment
Deployment considerations
Ports
Excalibur utilizes TLS over TCP.
Server listens on the following ports:
- Application server port - 6632/TCP - must be reachable by all clients and tokens, thus ideally reachable from public Internet.
- Facade port - 65321/TCP - must be reachable only from the machine hosting Facade component. Facade connects to the Excalibur Server on this port.
- HTTPS port - 443/TCP - used to serve Web management dashboard and static components necessary for integration to web-based systems such as SAML, ADFS, Citrix etc.
Specified port numbers are default port numbers and can be subject to change.
Excalibur connects to push notification servers to send push notifications to registered Tokens. Firewall must be configured to allow this Excalibur Server outgoing communication.
Excalibur uses built-in MariaDB database for storing all the data.
Excalibur Server runs always on the latest stable Node.js release at the time of deployment. Excalibur ships with static build of Node.js and with all the required packages pre-packaged - as all packages used are inspected by hand.
Excalibur is shipped as docker swarm stack, thus it is recommended to deploy it on a docker swarm cluster. Excalibur can be deployed on a single node as well, but it is not recommended for production use. Excalibur is designed to be highly available and resilient to failures, thus it is recommended to deploy it on a cluster of at least 3 nodes.
Pilot deployment HW requirements for the Excalibur Server are:
| CPU cores | 8 |
| RAM | 8 GB |
| Disk space | 100 GB |
| OS | Ubuntu LTS / RHEL LTS (min. Maintenance support) |
| Docker runtime | Latest stable release |
Facade must be installed on an AD joined server (can be Active Directory server but that is not required) in the domain where the pilot users are and pilot machines are domain-joined. Facade does perform cryptographic operations for which the AD Server should have sufficient CPU capacity to accommodate. The AD Server on which Facade is installed can be any Windows Server 2008R2 and newer. Facade is 64 bit only.
Windows is the preferred Client OS.
Client OS can be any Windows 7 / Windows 2008R2 and newer. Both 32 and 64 bit OS versions are supported.
Token support considerations:
- Android 6 and newer due to native fingerprint support
- iOS 10 and newer
- Hardware biometric sensor is strongly preferred on all devices
Certificates
All certificates are issued utilizing Certificate Signing Requests (CSR).
Server certificate
- Server certificate is unique for each deployment and is issued by CA
- Private key is generated during installation package build process, embedded in the installation package and is known only to server. Application vendor does not store the private key in any form.
- Certificate is used for mutually authenticated TLS, signing the DB entries and for issuing token and client certificates, thus acts as an Intermediate CA
- Certificate is accessible to all authenticated components from server
Facade certificate
- Facade certificate is unique for each deployment and is issued by CA
- Private key is generated during installation package build process, embedded obfuscated in the .msi installation package and is known only to **facade*. Application vendor does not store the private key in any form.
- Certificate is used for mutually authenticated TLS and for signing the DB entries
- Certificate is accessible to all authenticated components from server
Token certificates
Built-in certificate
- Built-in token certificate is common for all tokens, is issued by CA and is embedded in the mobile application package
- Certificate is used only for first TLS connection to server
Issued certificate
- Issued token certificate is unique for each token, is issued by server and is stored in the local storage of the mobile application
- Certificate is used for all consecutive TLS connections to server
- Certificate is accessible to all authenticated components from server
- Private key is generated during the first mTLS connection to server and is known only to token
Client certificates
Built-in certificate
- Built-in client certificate is common for all clients, is issued by CA and is embedded in the client *.msi installation package
- Certificate is used only for first TLS connection to server
Issued certificate
- Issued client certificate is unique for each client, is issued by server and is stored in the local storage of the client
- Certificate is used for all consecutive TLS connections to server and to encrypt user credentials during authentication
- Certificate is accessible to all authenticated components from server
- Private key is generated during the first mTLS connection to server and is known only to client
User certificate
- User certificate is unique for each user, is issued by CA during registration and is stored in the local storage of the token
- Private key is known only to token and is HW-backed by secure enclave
- Certificate is used for signing the DB entries
- Public key can be obtained by any authenticated component from server
Cryptographic operations
Signing entries
Signing database entry means converting the DB entry to JSON format, sorting keys alphabetically, generating SHA512 hash from the JSON string and then RSA encrypting it with a private key.
// Convert the database entry to JSON format
json_entry = convert_to_json(database_entry)

// Sort the keys alphabetically
sorted_json_entry = sort_keys_alphabetically(json_entry)

// Generate SHA512 hash from the JSON string
hash = generate_sha512_hash(sorted_json_entry)

// Encrypt the hash with the private key
signature = encrypt_with_private_key(hash, private_key)

// Return the signature
return signature
Signatures can be chained creating a signature chain so each entry can be signed by multiple parties.
Signature verification
Verification of the database entry signature means converting the database entry to JSON format, sorting keys alphabetically, generating SHA512 hash from the JSON string and then comparing it to the RSA decrypted signature with known public key of the signatory for each of the signatures from the signature chain.
// Convert the database entry to JSON format
json_entry = convert_to_json(database_entry)

// Sort the keys alphabetically
sorted_json_entry = sort_keys_alphabetically(json_entry)

// Generate SHA512 hash from the JSON string
hash = generate_sha512_hash(sorted_json_entry)

decrypted_signature = decrypt_with_public_key(signature, public_key)

// Compare the decrypted signature with the generated hash
if decrypted_signature == hash:
    // Signature is valid
    return true

// Not a valid signature
return false
Each certificate used is verified against the CA chain.
Cryptographic parameters
In Excalibur context, data being encrypted is never longer than the key, thus RSA can be used to encrypt the whole data. Optimal Asymmetric Encryption Padding (OAEP) is used as the padding scheme for encryption and Probabilistic Signature Scheme (PSS) for signatures. By default, all RSA operations use 2048 bit key length and AES is utilized with 256 bits key size in GCM mode. Where applicable ECC cryptography is used (apple devices), curves used: secp521r1:secp384r1. Default TLS cipher suites: ECDHE-RSA-AES256-GCM-SHA384:ECDHE-ECDSA-AES256-GCM-SHA384. TLS versions used: 1.2, 1.3.
Token TLS certificate initialization
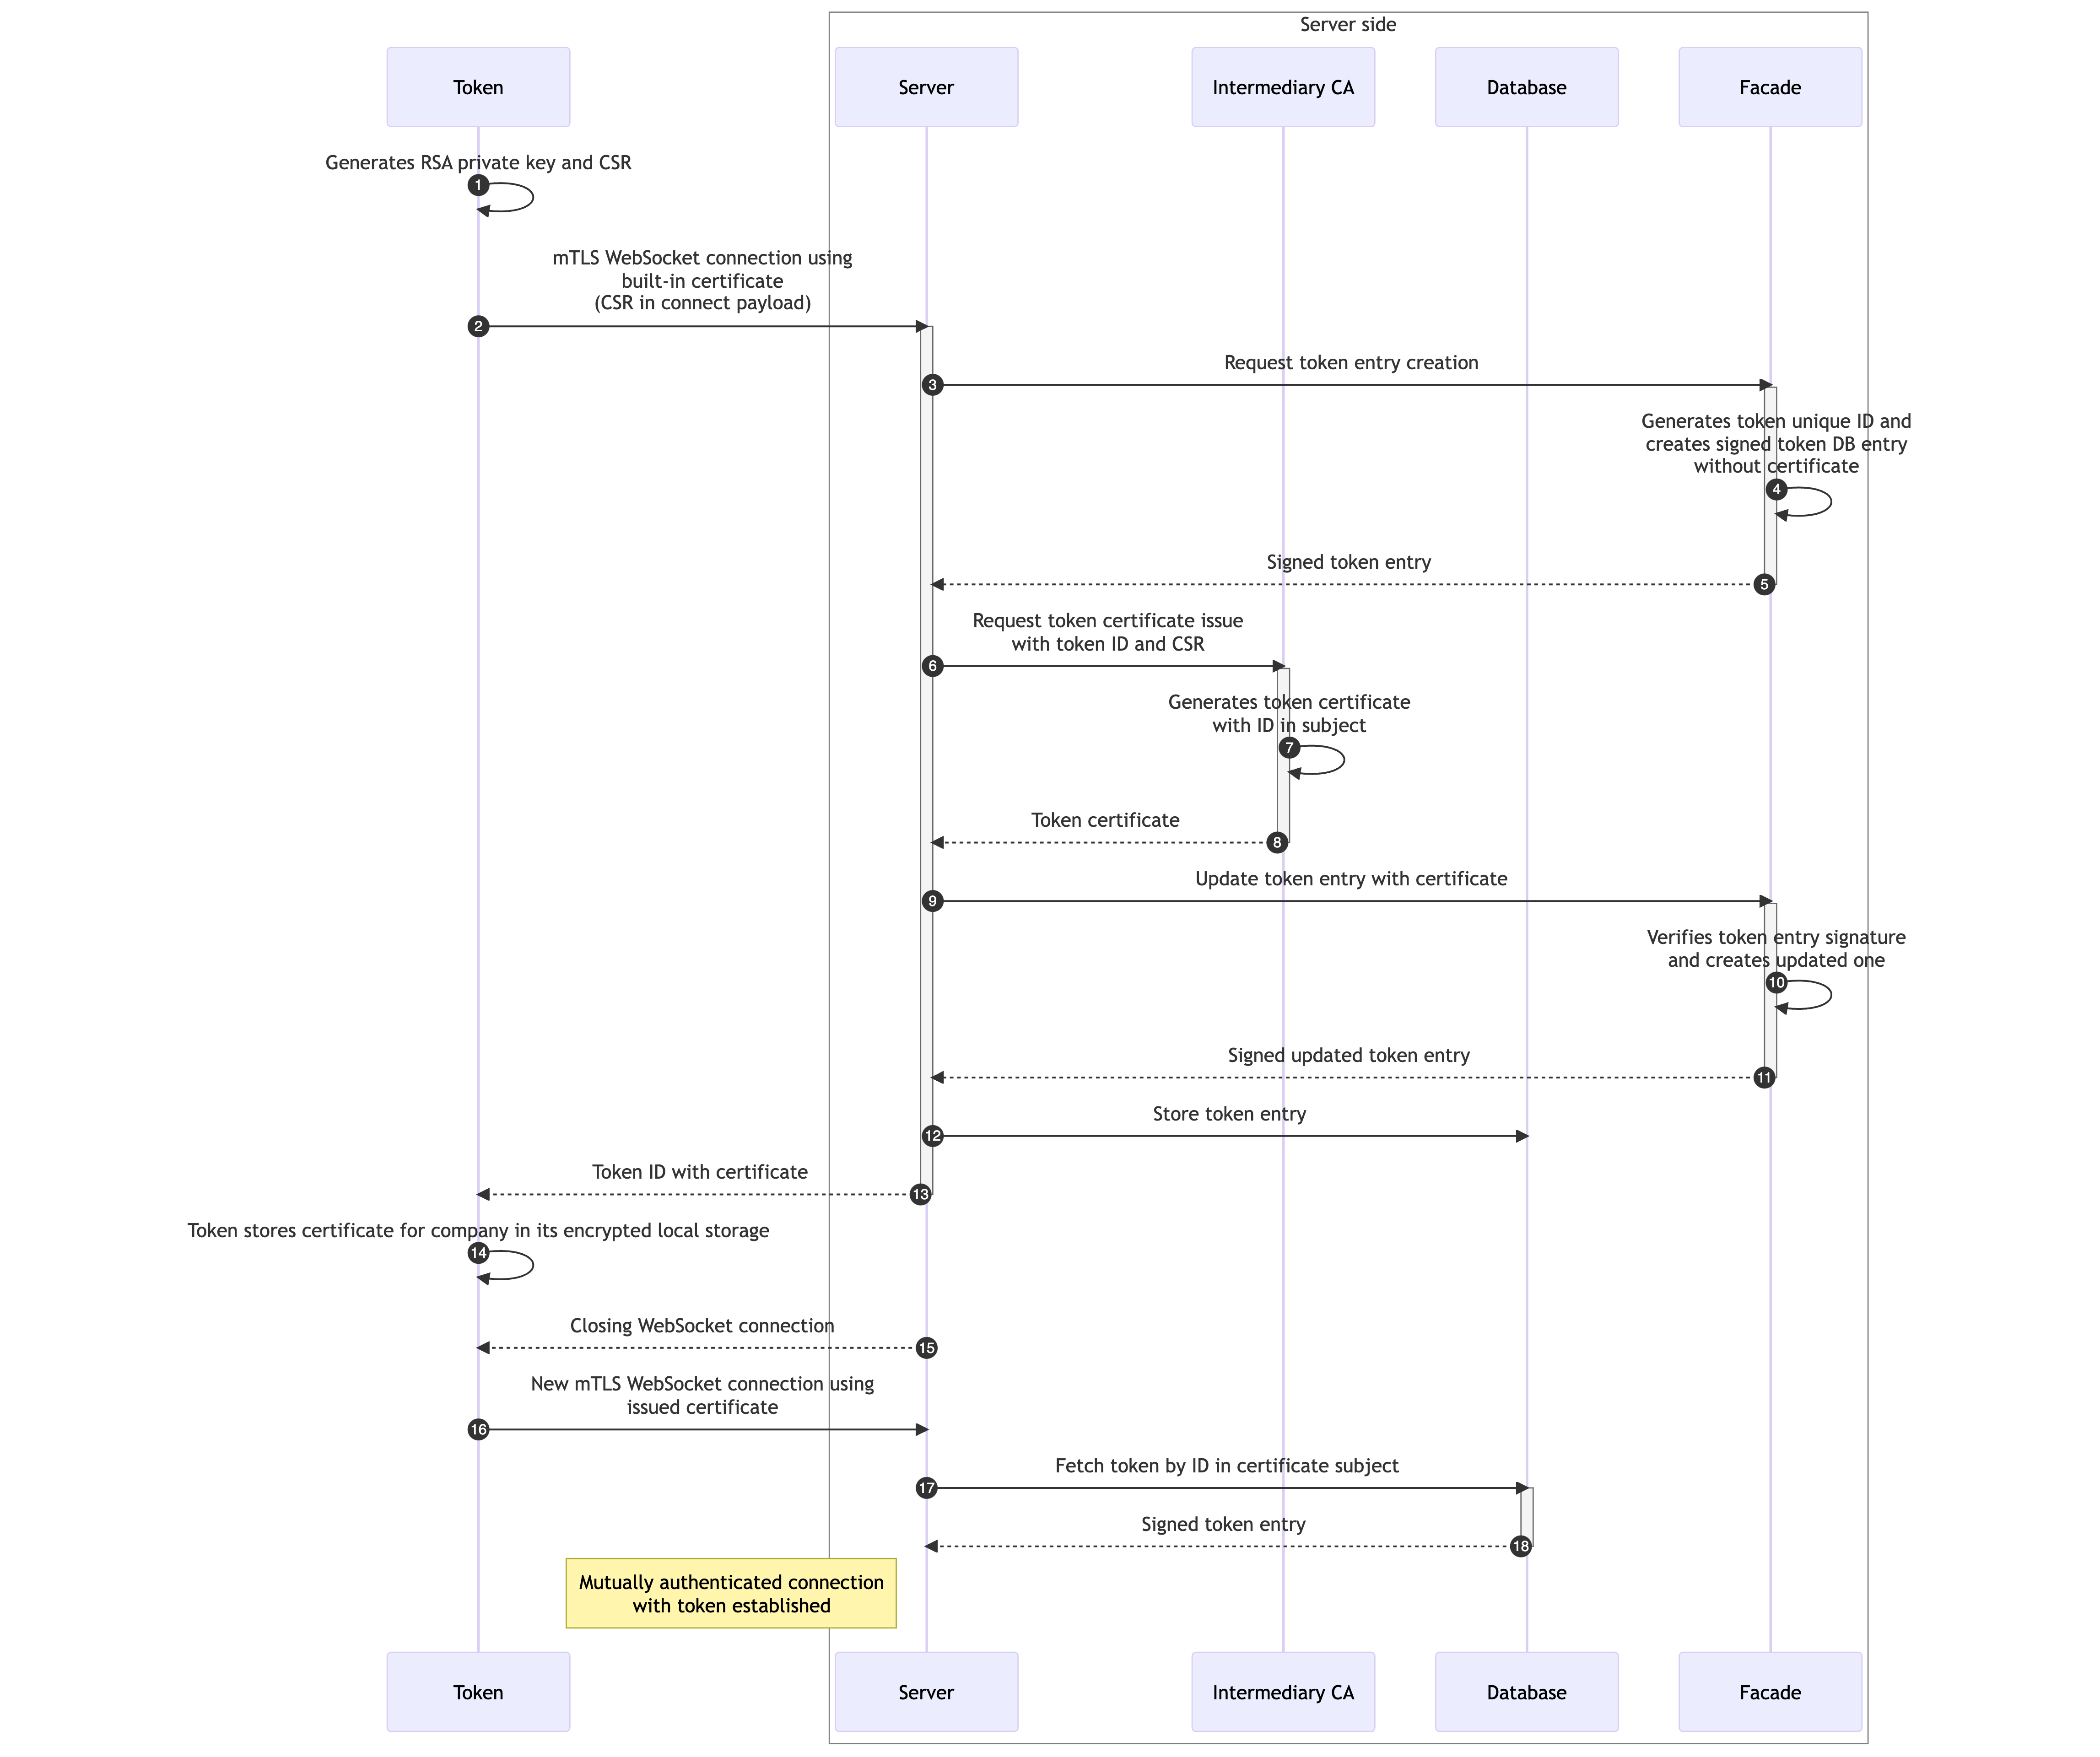
- Token generates RSA key pair of 2048 bits length for TLS connection and generates certificate signing request (CSR).
- Token connects to Server using built-in token certificate issued by CA over mutually authenticated TLS (mTLS) Websocket connection and sends CSR with token information (name, udid, system, version, ...) to the Server.
- Server sends token information to Facade and requests token entry creation.
-
Facade generates unique random token ID, creates token DB entry and signs it with Facade private key.
Token entry Value Description tokenID uint64 Random ID generated by Facade uid string Unique device identifier (This identifier does not identifies device, but installed application) name string Token name platform string Android, iOS certificate string Certificate used for TLS connection active uint Active status ( 0 / 1 ) signature string Facade signature of the Token DB entry -
Facade sends signed token DB entry to Server.
- Server requests certificate issue from Intermediate CA using token ID and CSR.
- Intermediate CA issues certificate from CSR and sends it back to the Server. Token ID is used as a unique identifier for the certificate and is stored in the certificate subject.
- Intermediate CA sends issued certificate to the Server.
- Server requests from Facade token entry update with issued certificate.
- Facade verifies token entry signature, updates token DB entry with issued certificate and signs it with Facade private key.
- Facade sends signed updated token DB entry to Server.
- Server stores token DB entry in database with its signature.
- Server sends issued certificate and token ID to the Token.
- Token stores issued certificate for company in local storage.
- Server gracefully closes the connection with the Token.
- Token reconnects to the Server using issued certificate.
- Server gets token ID from subject of authenticated Websocket connection certificate subject and requests token DB entry from database.
- Database returns token DB entry and connection with Token is successfully established.
Client TLS certificate initialization
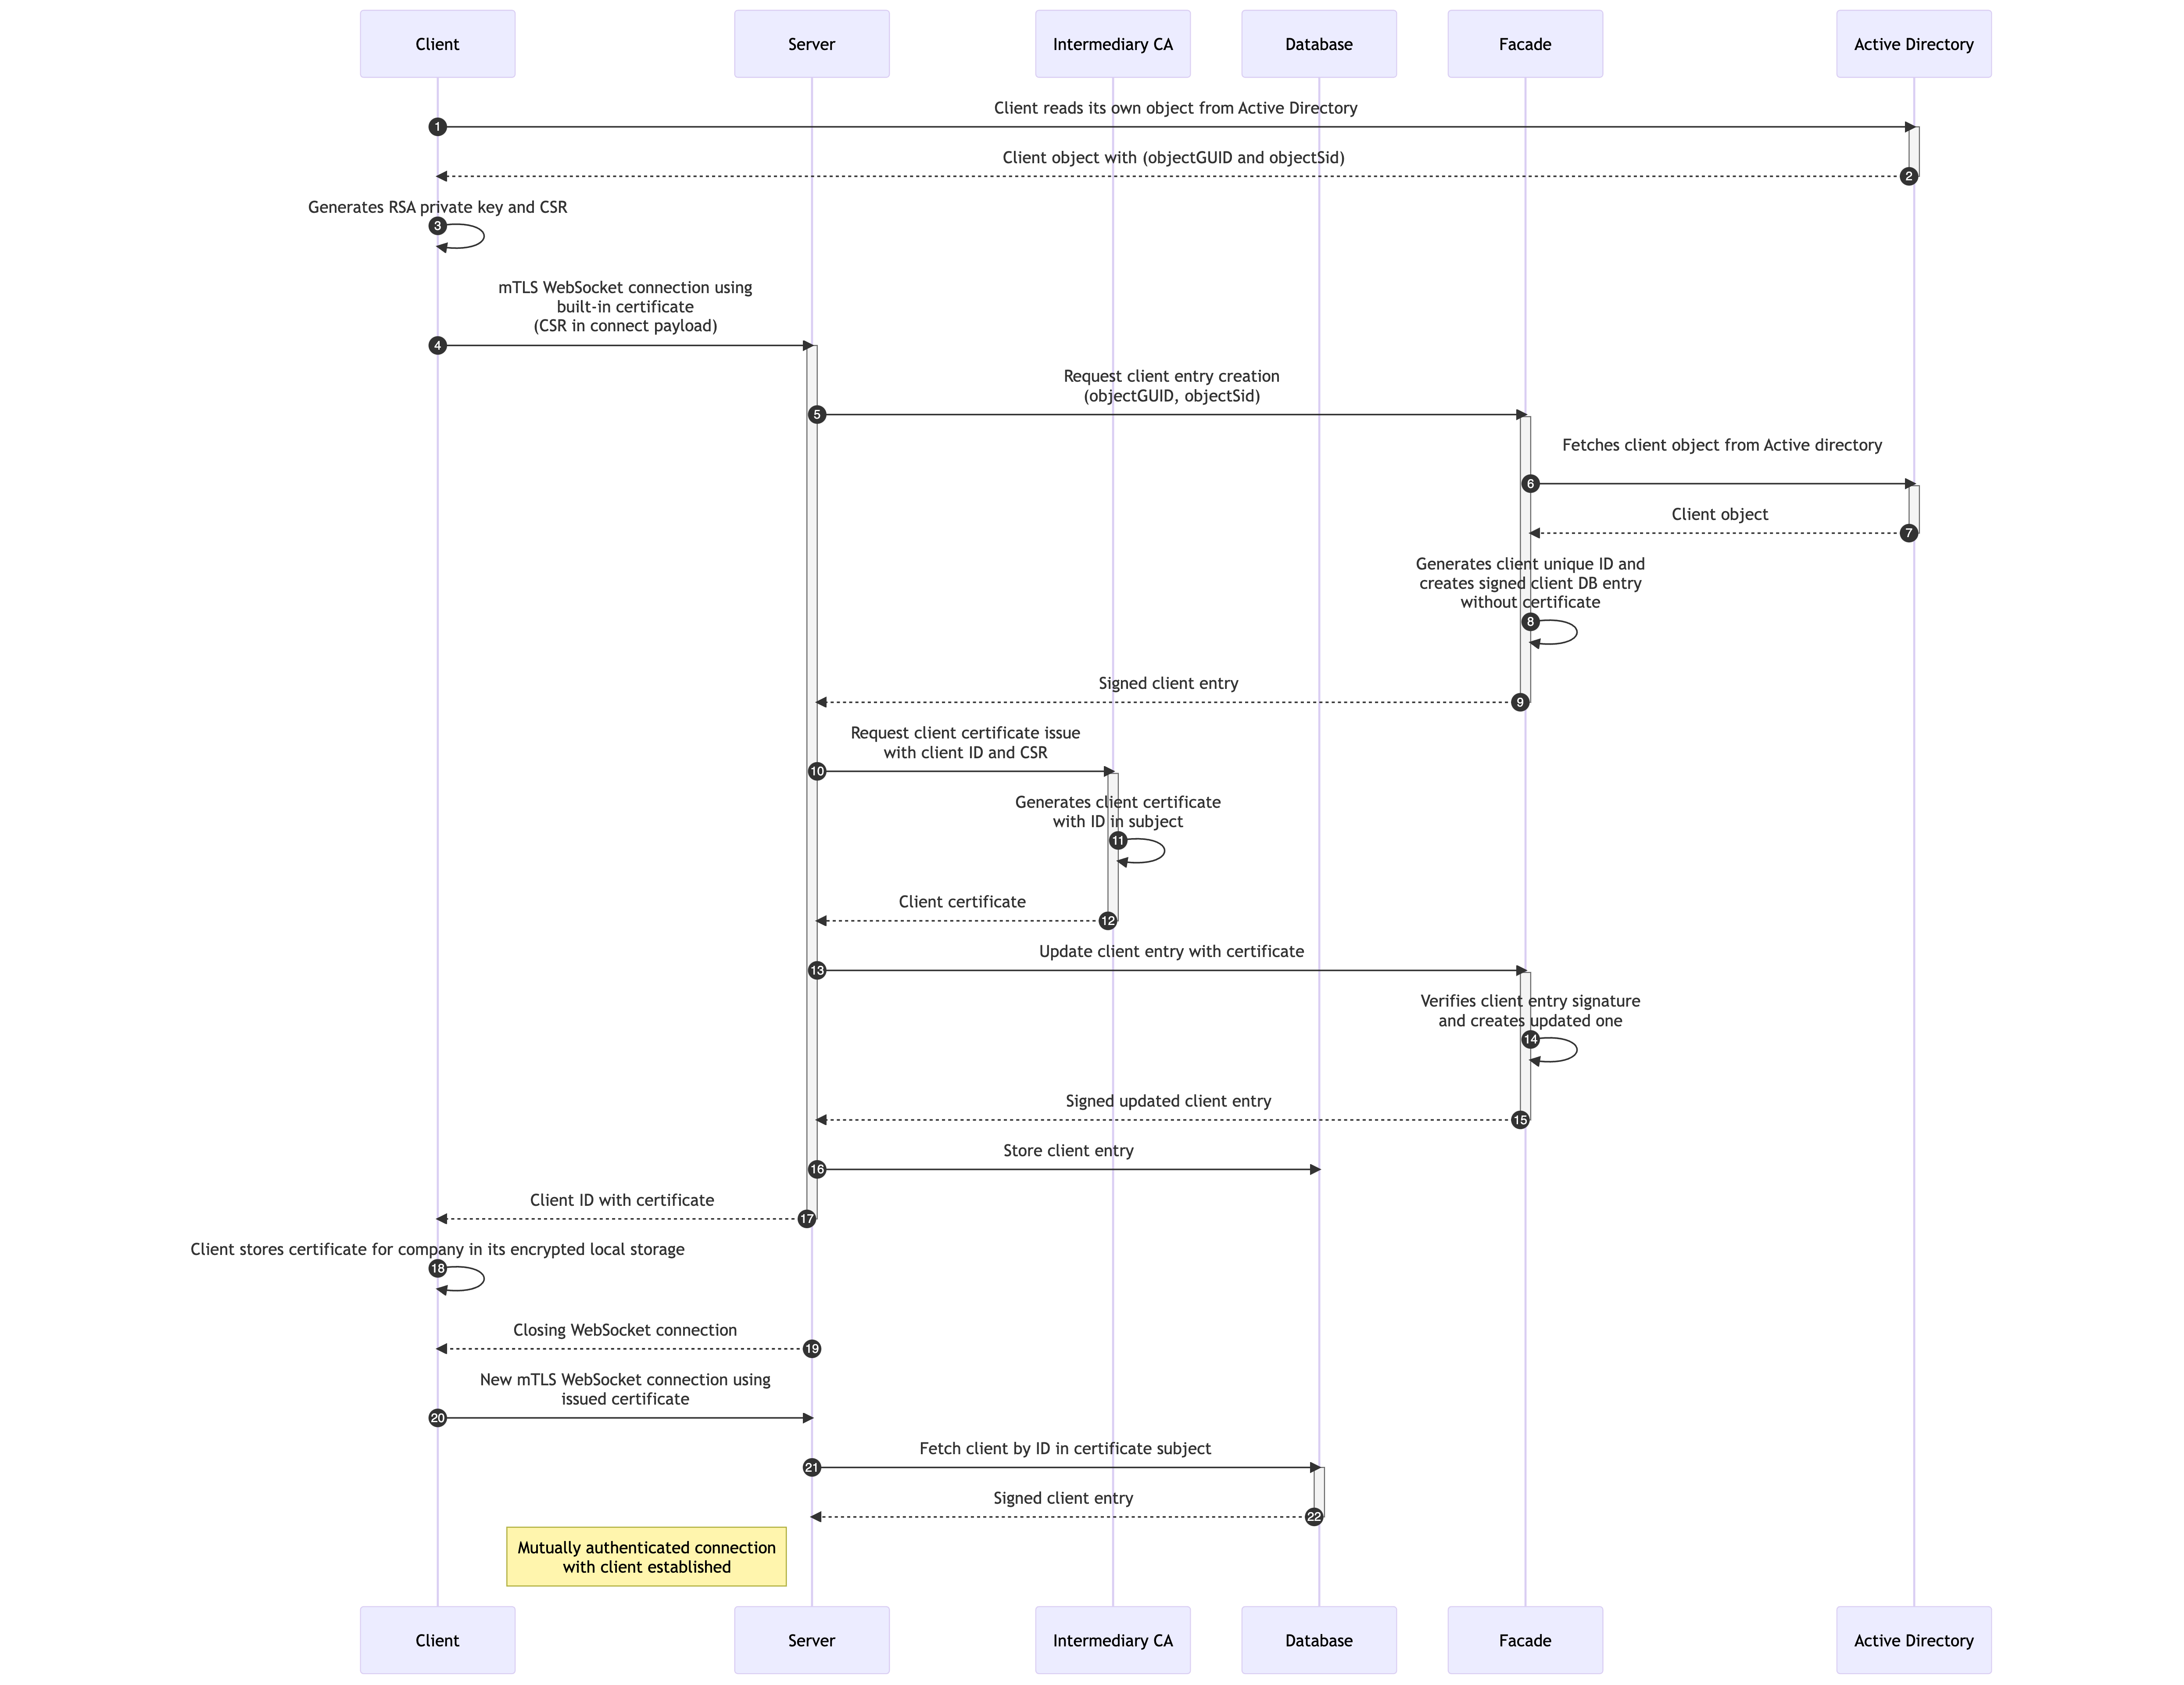
- Client fetches its object from Active Directory. Object contains computer information and also objectGUID and objectSid. Computers joined in domain has read access to its object with computer account. Combination of objectGUID and objectSid is unique for each computer and is used to identify computer connected to the Server.
- Active Directory returns object to the Client.
- Client generates RSA key pair of 2048 bits length for TLS connection and generates certificate signing request (CSR).
- Client connects to Server using built-in client certificate issued by CA over mutually authenticated TLS (mTLS) Websocket connection and sends CSR with client information (name, uid, objectGUID, objectSid, ...) to the Server.
- Server sends client information to Facade and requests client entry creation.
- Facade fetches client object from Active Directory using objectGUID, objectSid and verifies that object exists and that matches the client information from the Server.
- Active directory returns client object to the Facade.
-
Facade generates unique random client ID, creates client DB entry and signs it with Facade private key.
Client entry Value Description clientID uint64 Random ID generated by Facade uid string Unique identifier name string Client name type string Client type ( workstation / web / ... ) data string Additional json encoded data ( domain, objectGUID, ... ) certificate string Certificate used for TLS connection active uint Active status ( 0 / 1 ) signature string Facade signature of the Client DB entry -
Facade sends signed client DB entry to Server.
- Server requests certificate issue from Intermediate CA using client ID and CSR.
- Intermediate CA issues certificate from CSR and sends it back to the Server. Client ID is used as a unique identifier for the certificate and is stored in the certificate subject.
- Intermediate CA sends issued certificate to the Server.
- Server requests from Facade client entry update with issued certificate.
- Facade verifies client entry signature, updates client DB entry with issued certificate and signs it with Facade private key.
- Facade sends signed updated client DB entry to Server.
- Server stores client DB entry in database with its signature.
- Server sends issued certificate and client ID to the Client.
- Client stores issued certificate for company in local storage. Clients use Windows registry as local storage. Data is encrypted using built-in windows encryption, that ensures that only user who encrypted the data can decrypt it.
- Server gracefully closes the connection with the Client.
- Client reconnects to the Server using issued certificate.
- Server gets client ID from subject of authenticated Websocket connection certificate subject and requests client DB entry from database.
- Database returns client DB entry and connection with Client is successfully established.
Policies and Factors
Policy is a set of rules specified for an action performed by Excalibur User which needs to be fulfilled to allow the action. Policy can specify which factors need to be provided by the user, allows the action to be performed just on some subset of clients, inside specified sets of geofences, and / or at the right time and day of a week.
Policies can contain any of the following rules and their combinations:
- Factors
- Fingerprint
- PIN
- Face recognition
- Geofences - subset of geofences where user must be physically located to perform the action
- Clients - subset of clients on which the action is allowed to be performed
- Time of day
- Day of week
- IP address of the client
- IP address for the token
- Additional verification by manager / admin / support center or by peer
When registering, Token generates private / public key pairs for each supported factor using HW-backed secure enclave. Public key is then signed by Token with userCompanyPrivateKey and sent to the Server to be stored for Factor Verification.
Fingerprint private-public Key pair is generated in such a way that every future signing of the data with a private key requires a fingerprint to be provided to unlock it.
PIN privateKey is only accessible after entering the correct PIN, rate limit is applied both locally and on the Server.
Location privateKey is used to sign the location sent to the Server.
Factor Verification
When verifying the factor for some intent (see Excalibur Actions: User Intent) the factorPrivateKey is first retrieved from the secure enclave by providing fingerprint or correct PIN, which is then used to sign intent encoded in JSON format (keys sorted alphabetically). Factor signature is then appended to the intent and sent to the Server which can verify that signature with factorPublicKey for the given user and factor.
When verifying location {latitude, longitude, accuracy} JSON is signed with locationPrivateKey and sent to the Server to prove that location was indeed reported from the Token.
Every Excalibur action is represented by an intent DB entry which is signed by the User with userCompanyPrivateKey and sent to the Server. Server verifies the intent’s signature and user's right to perform the requested action, then asks the User to provide all necessary factors according to the matching security policy.
| User Intent | Value | Description |
|---|---|---|
| tokenID | uint64 | tokenID generated by the Server |
| userID | uint64 | userID from user certificate, verifier userID |
| accountID | uint64 | accountID to use while performing action, 0 for verification |
| action | string | “registration” / “authentication” / “authorization” / “verification” |
| actionToken | uint64 | actionToken |
| targetID | uint64 | clientID for authentication, userID of initiator for verification |
| targetSignature | string | userCompany Signature of the target entry ( client, user ) |
| timestamp | uint64 | current timestamp |
| signature | string | userCompany Signature of the user intent |
Intent authentication factor checking is performed by the intent being signed on the Token using the privateKey of the Authentication factor used to confirm it. Multiple factors and their combinations are supported which is represented by multiple signatures of the intent. Server verifies the intent signature(s), verifies it’s matching the intent being confirmed, signs the intent using serverPrivateKey, stores the intent in DB and forwards it to the target component which verifies the intent and policy before executing the performed action.
Policy together with the signed intent and factor signatures of the intent can be then easily verified by each component participating in the processed action, and if just one component fails to verify all the signatures in the signature chain, the action is immediately stopped.
Excalibur Actions
Registration
Registration is first action which User needs to perform to be able to perform any other action using Excalibur. During first registration, user certificate is issued and private / public key pairs for factors are created and set for the Token. Result of registration are signed user, account, token and factors entries stored in the database creating undisputable bond between these entries.
Registration QR code
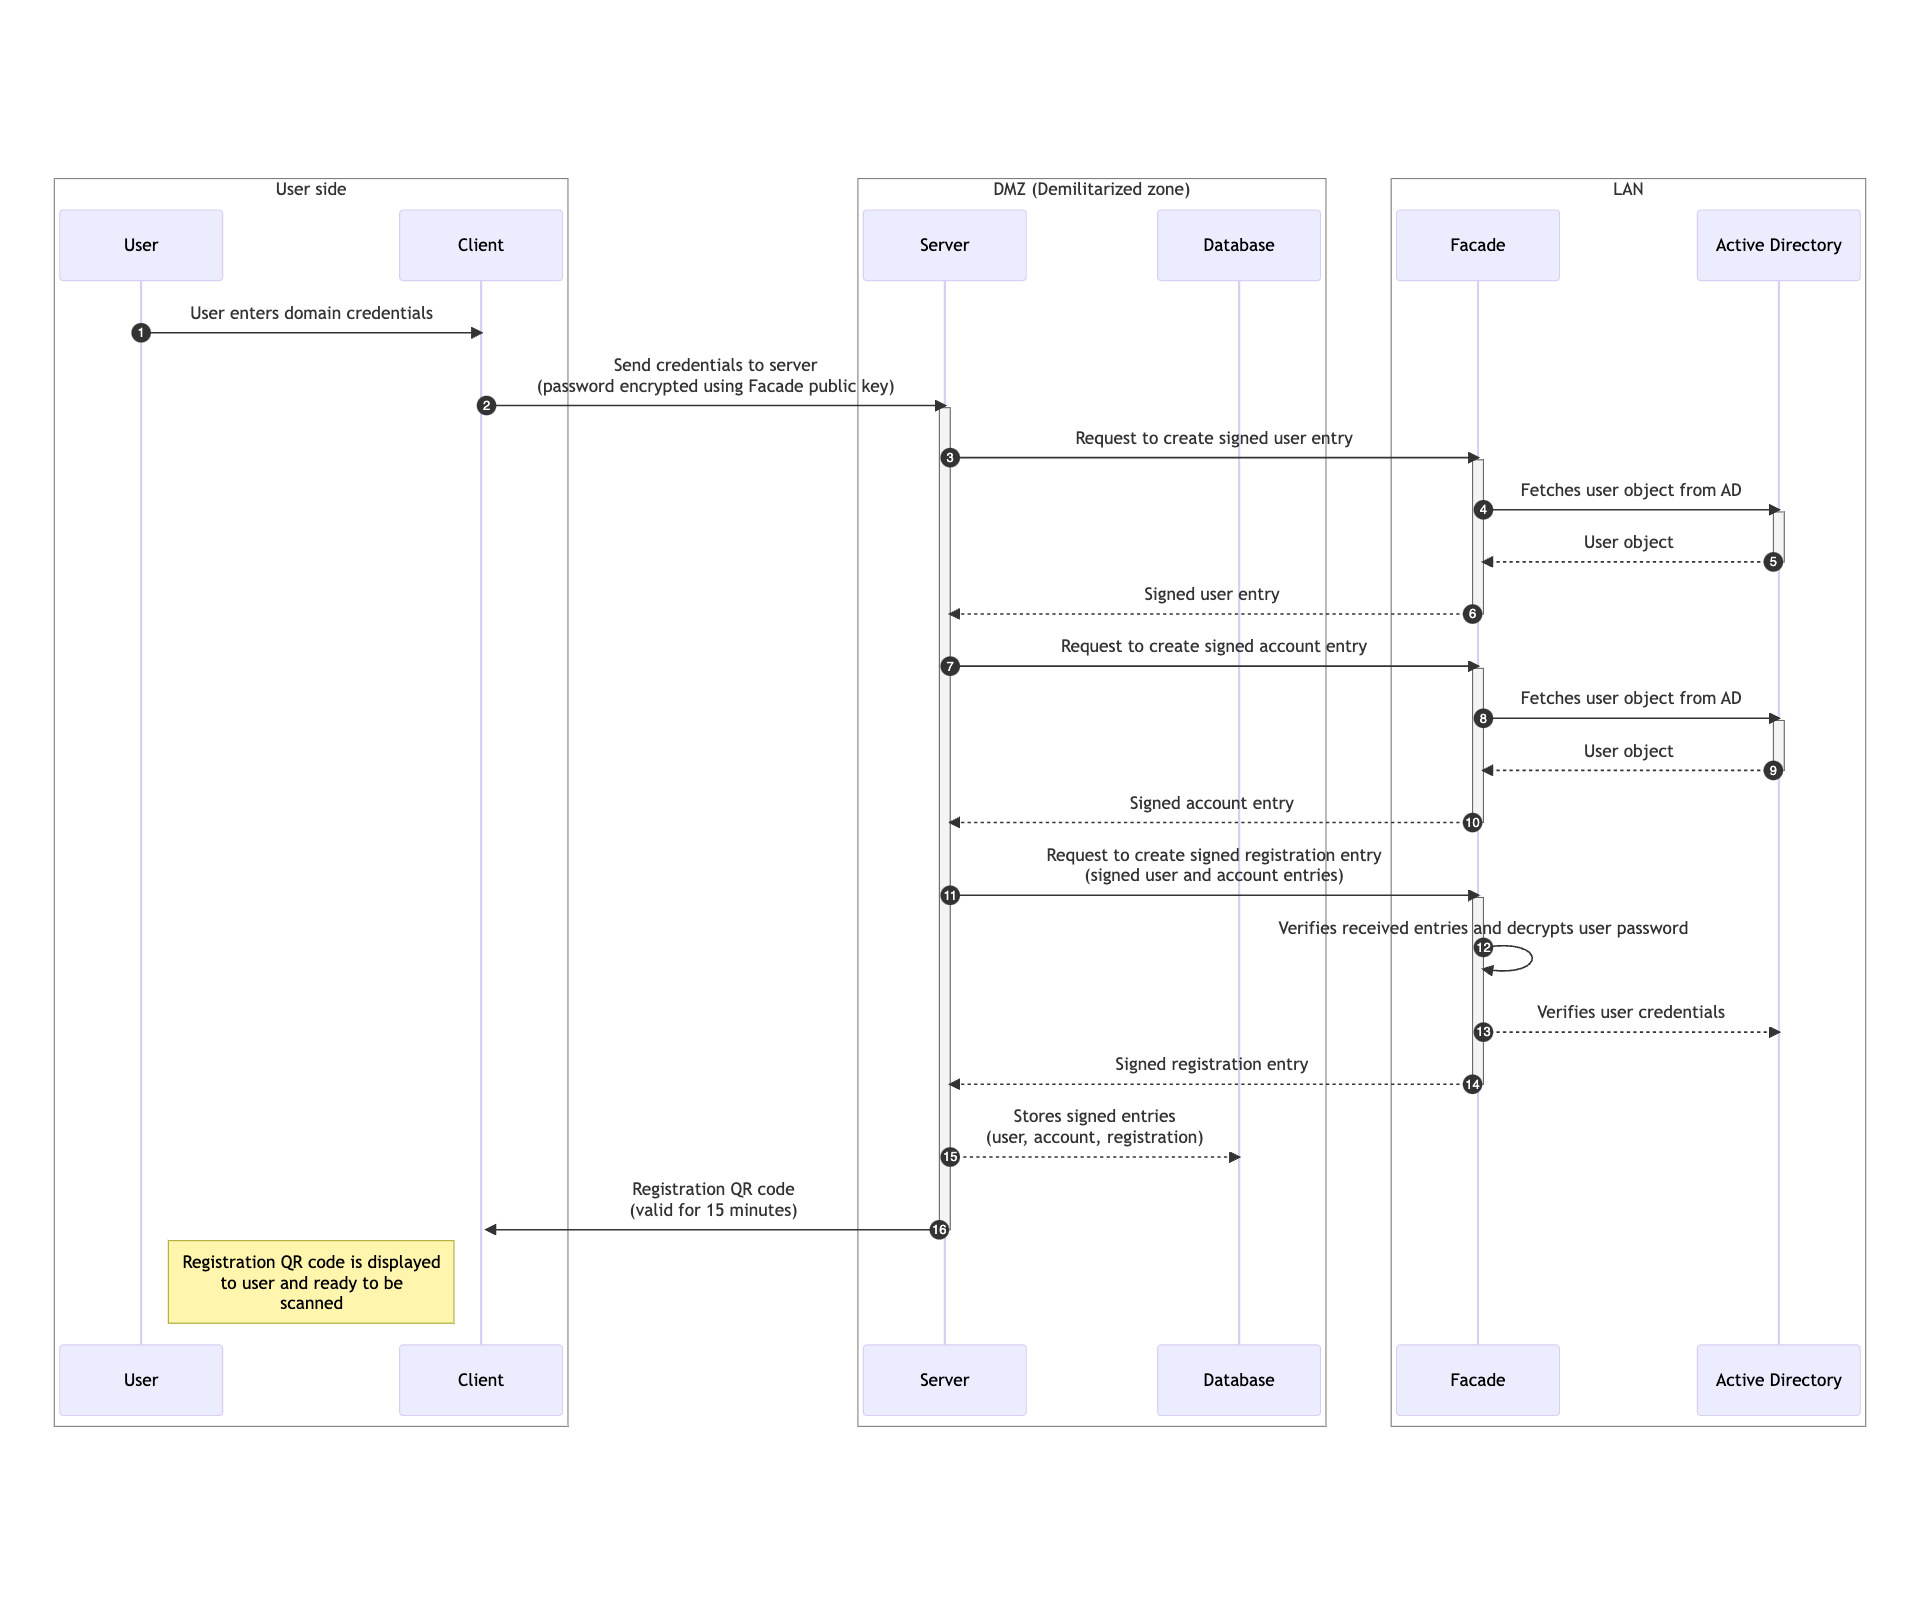
- User begins registration by entering his domain credentials into Excalibur UI on any client connected to the server.
- Client encrypts user password using known facade public key and forwards credentials to server.
- Server forwards the received user name (DOMAIN\sAMAccountName) to the facade and requests creation of signed user entry.
- Facade fetches user object from Active Directory by sAMAccountName
- Active Directory returns user object to the facade.
-
Facade generates unique random user ID, creates user DB entry, signs it with facade private key and sends it back to the server.
User entry Value Description id uint64 Random unique ID generated by Facade name string User name surname string User surname email string E-mail address certificate string User certificate active uint Active status (0 / 1) created uint64 Creation timestamp updated uint64 Last update timestamp signature string Facade signature of the User database entry -
Server forwards the received user name (DOMAIN\sAMAccountName) to the facade and requests creation of signed account entry.
- Facade fetches user object from Active Directory by sAMAccountName
- Active Directory returns user object to the facade.
-
Facade generates unique random account ID, creates account DB entry, signs it with facade private key and sends it back to the server.
Account entry Value Description id uint64 Random unique ID generated by Facade clientID uint64 0 for Active Directory account, clientID for local account type string Account type (Active Directory / local / ...) data string Additional JSON-encoded account data (dn, objectGUID, manager, memberOf, ...) username string username / DOMAIN\username / email / ... active uint Active status (0 / 1) created uint64 Creation timestamp updated uint64 Last update timestamp signature string Facade signature of the account DB entry -
Server requests facade to create signed registration entry. Signed user and account entries are sent to the facade as part of the request along with encrypted user password.
- Facade verifies received user and account entries signatures and decrypts user password using facade private key.
- Facade verifies user credentials against Active Directory.
-
Facade generates unique random registration ID, creates registration DB entry, signs it with facade private key and sends it back to the server. Registration entry contains both user ID and account ID. Registration entry contains also its validity timestamp, after which registration is no longer valid.
Registration entry Value Description id uint64 Random unique ID generated by Facade userID string 0 for any user, userID for a specific user only accountID uint64 Account ID creator string Registration origin - client / dashboard / ... validUntil uint64 Validity timestamp - max 24h from creation active uint Active status (0 / 1) signature string Facade signature of the Registration DB entry -
Server verifies received entries signatures and stores them in the database.
- Server generates registration QR code containing companyID, registrationID and server FQDN and sends it back to the client.
User registration
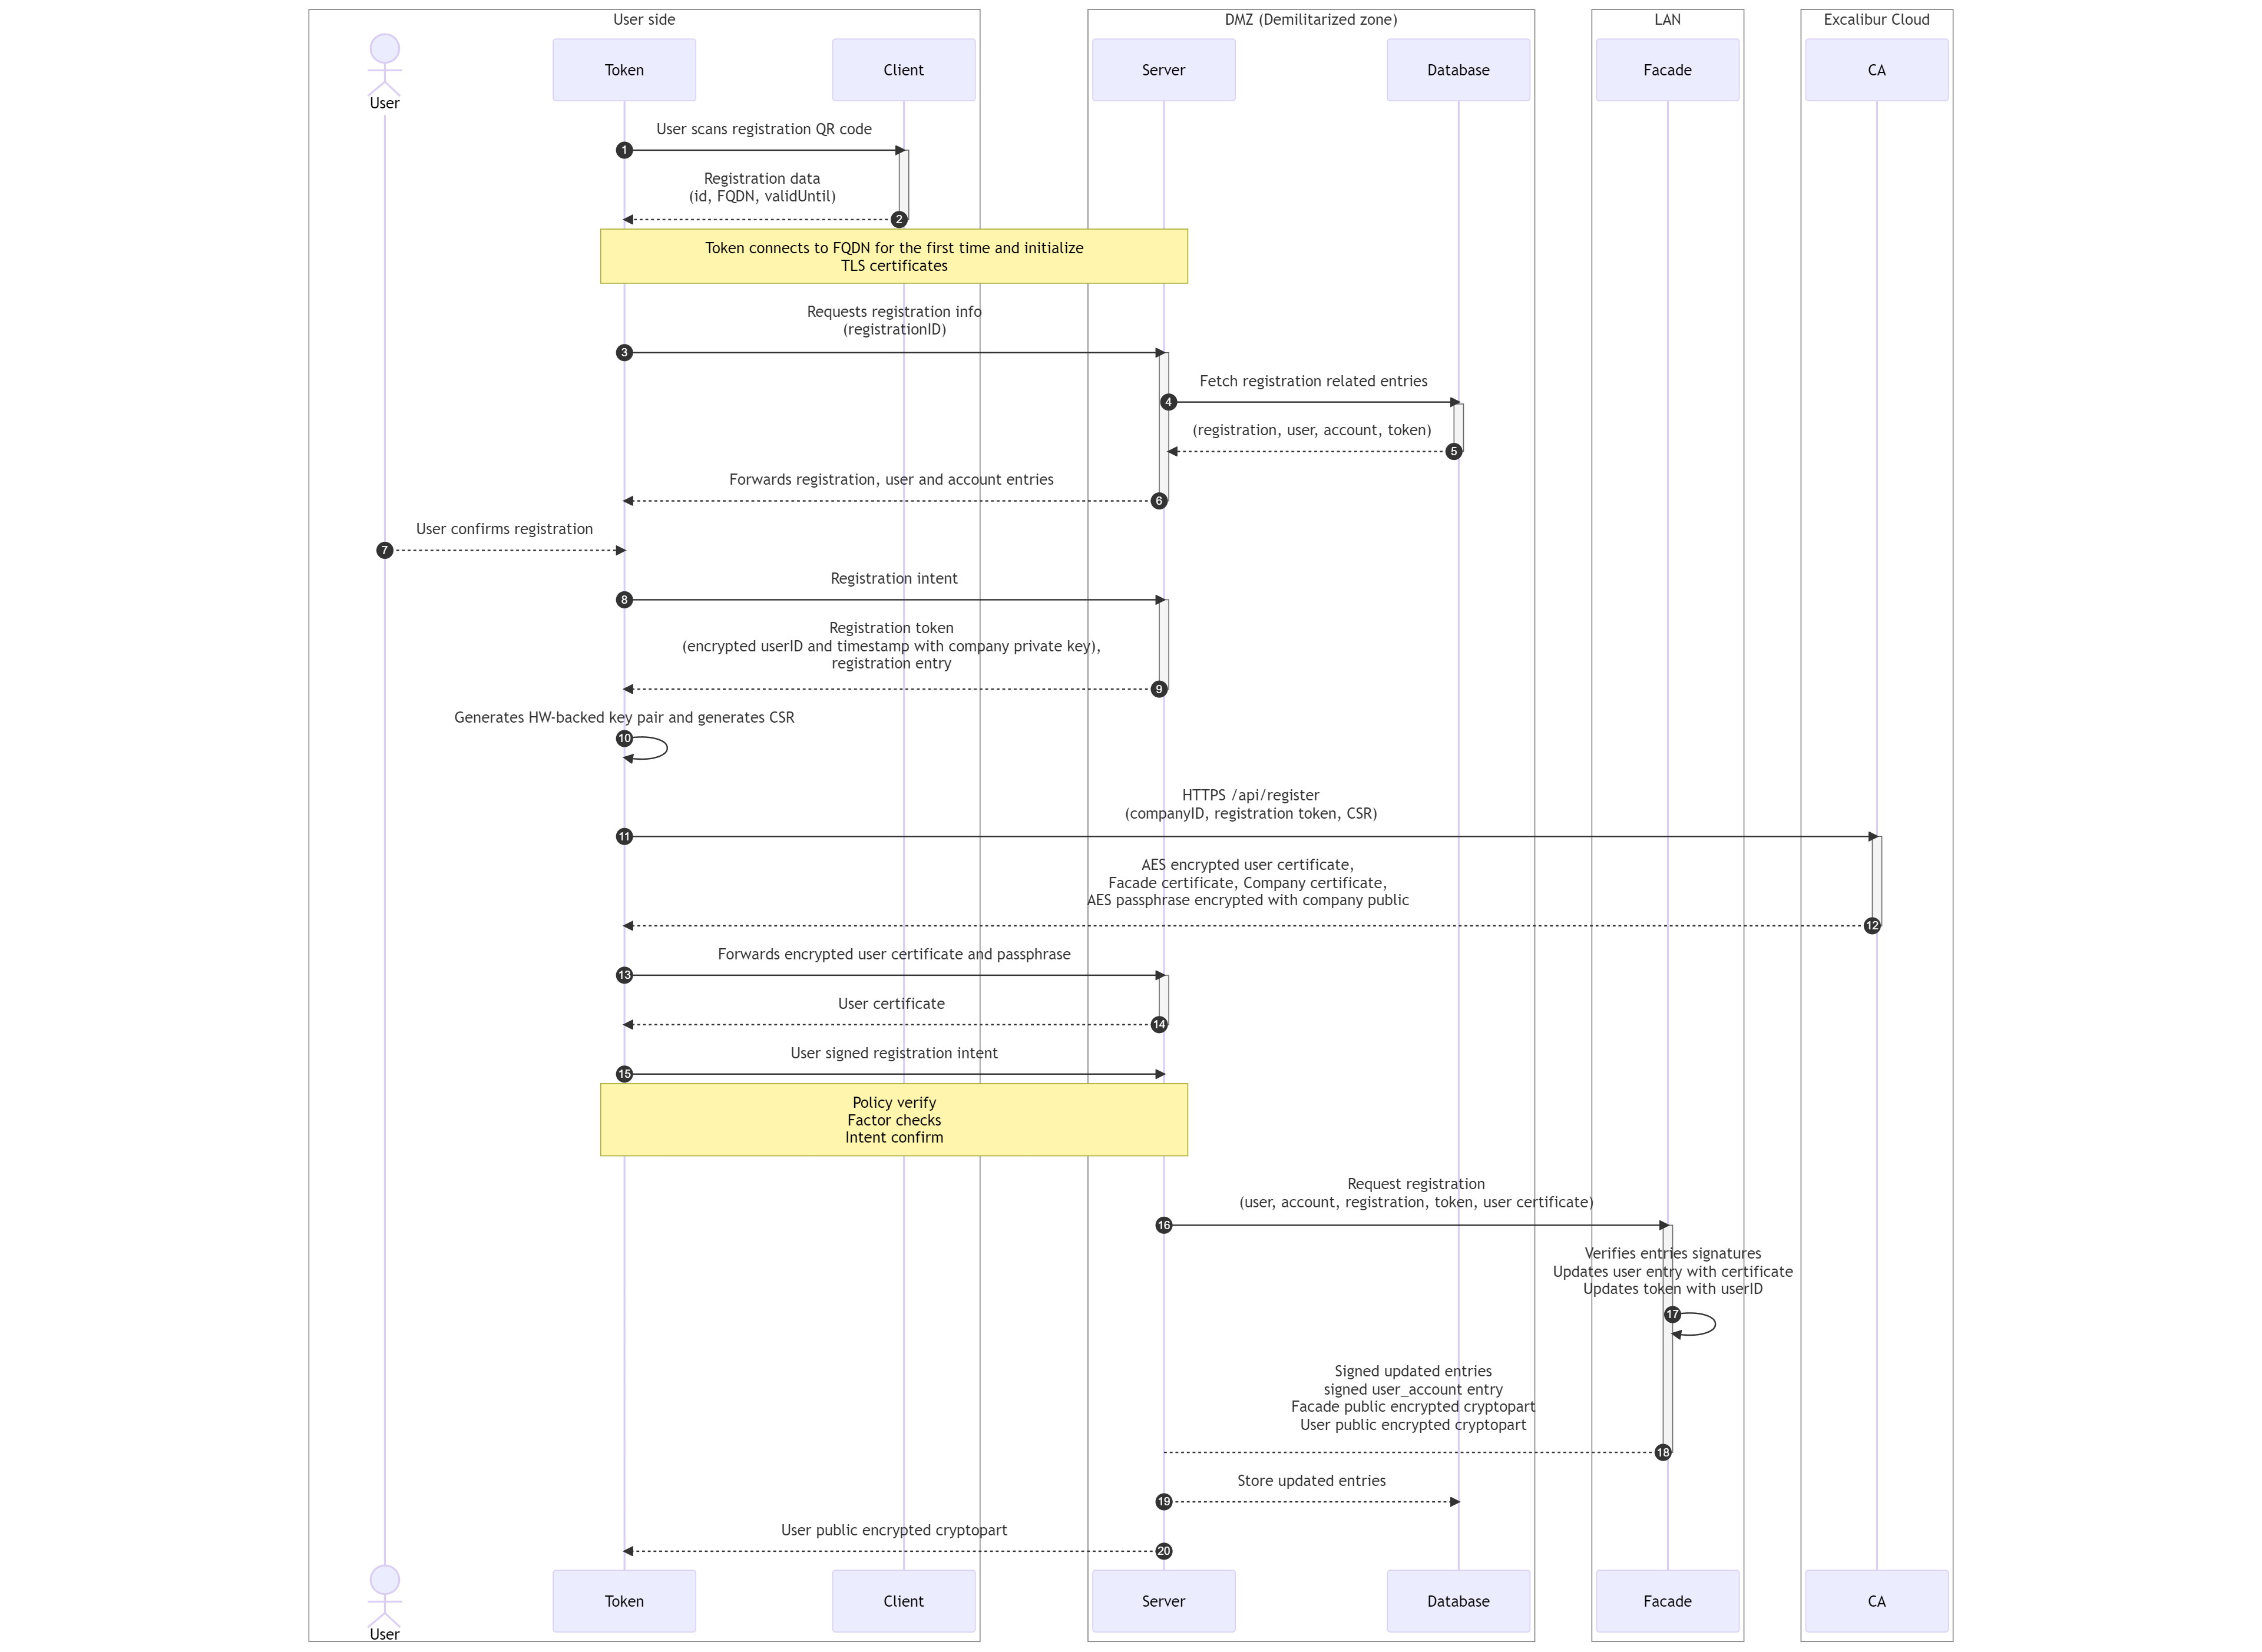
- User using his Token scans the generated registration QR code from the client user interface.
- Token decodes scanned QR code. Registration QR code contains companyID, registrationID and server FQDN. Token establishes connection to the server using server FQDN as described in Client TLS certificate initialization.
- Token sends registration ID to the server to retrieve registration related database entries.
- Server retrieves stored registration, user and account database entries using registration ID and also retrieves token database entry using token ID of connected Token.
- Database returns registration, user, account and token database entries to the server.
- Server forwards registration, user and account database entries to the token.
- Token verifies received entries signatures, displays registration information to the user and asks him to confirm the registration.
-
Token creates registration intent and sends it to the server.
Registration intent Value Description tokenID uint64 Token ID generated by the Server userID uint64 User ID from userCompany certificate accountID uint64 Account ID of the registered account action string "registration" actionToken uint64 Registration ID targetID uint64 Registration ID targetSignature string User signature of the Registration DB entry timestamp uint64 Current timestamp signature string User signature of the registration intent -
Server creates registration token, which is JSON object containing userID and server timestamp. This object is signed with server private key and sent back to the token along with registration database entry.
registration_token = { "userID": userID, "timestamp": current_timestamp_in_ms() } stringified = json_stringify(registration_token) encrypted_token = encrypt(stringified, server_private_key) - Token generates private / public key pair using HW-backed secure enclave and generates certificate signing request (CSR).
- Token creates HTTPS REST API request to the CA containing company ID, registration token and CSR.
- CA verifies registration token signature with server public key belonging to company specified by company ID and also verifies received registration database entry with facade public key belonging to same company. Using received timestamp in registration token and current timestamp, CA verifies that registration is still valid. On success, CA issues user certificate with user ID from registration token and stores it in the database under company and user ID. User ID is also stored in issued certificate subject. CA generates random AES password and encrypts user certificate with it. Password used to encrypt user certificate is encrypted with company public key. Both encrypted user certificate and encrypted password are sent back to the token along with company and facade certificates.
- Token forwards user certificate and encrypted password to the server.
- Server decrypts received AES password with server private key, using decrypted password decrypts user certificate and sends it back to the token.
- Token stores user certificate under company ID in local storage. Signs registration intent with user private key and sends it back to the server. Policy and factor verification is performed as described in Factor Verification.
- Server verifies received registration intent and requests registration from the facade. Server sends stored user, account, registration, token and user certificate to the facade.
-
Facade verifies received user, account, registration and token entries signatures and verifies that user certificate was issued by the CA. On success, facade updates user database entry with received user certificate, updates token database entry with user ID and creates user_account database entry signed with facade private key which creates link between user and account
UserAccount Entry Value Description userID uint64 User ID obtained from the certificate accountID uint64 Account ID obtained during the registration process active uint Status of the account (0 for inactive, 1 for active) signature string UserCompany's signature of the UserAccount DB entry -
Facade sends updated and signed user, registration, token and user_account database entries back to the server. Facade also sends user password to the server in form of two crypto-parts. First part is encrypted with facade public key, stored in database and second part is encrypted with user public key and sent to the server. Password is product od XOR operation of both parts.
- Server verifies received user, registration, token, user_account entries signatures and stores them in the database also with password crypto-part encrypted with facade public key.
- Server sends password crypto-part encrypted with user public key to the token, where it is stored in local storage
Authentication
Every Excalibur Authentication is intent-based, where the User intent is performed by scanning the dynamically changing (by default every 15 seconds, with 90 seconds validity) QR code from the display of the device where he wishes to login to. The QR code contains companyID, clientID, authenticationToken and pairingToken and by its dynamic nature provides a proximity feature - the user must be physically at the device to be able to scan it as it has limited time validity. As each QR code has validity of 90 seconds and every client generates new QR code after 15 seconds, every client holds FIFO queue of maximum 90/15 = 6 QR codes, thus 6 authentication / pairing token pairs. After authentication factors are successfully verified - password is securely reconstructed at the Client and injected into the login process.
Authentication (Dashboard / WebSDK)
Authentication to Dashboard and WebSDK components (ADFS, SAML, ...) shares the same authentication flow. Authentication is performed by scanning dynamically changing QR code from the display of the device where user wishes to login to. QR code contains companyID, clientID, authenticationToken and pairingToken and by its dynamic nature provides a proximity feature - user must be physically at the device to be able to scan it as it has limited time validity.
Dashboard authentication QR code generation
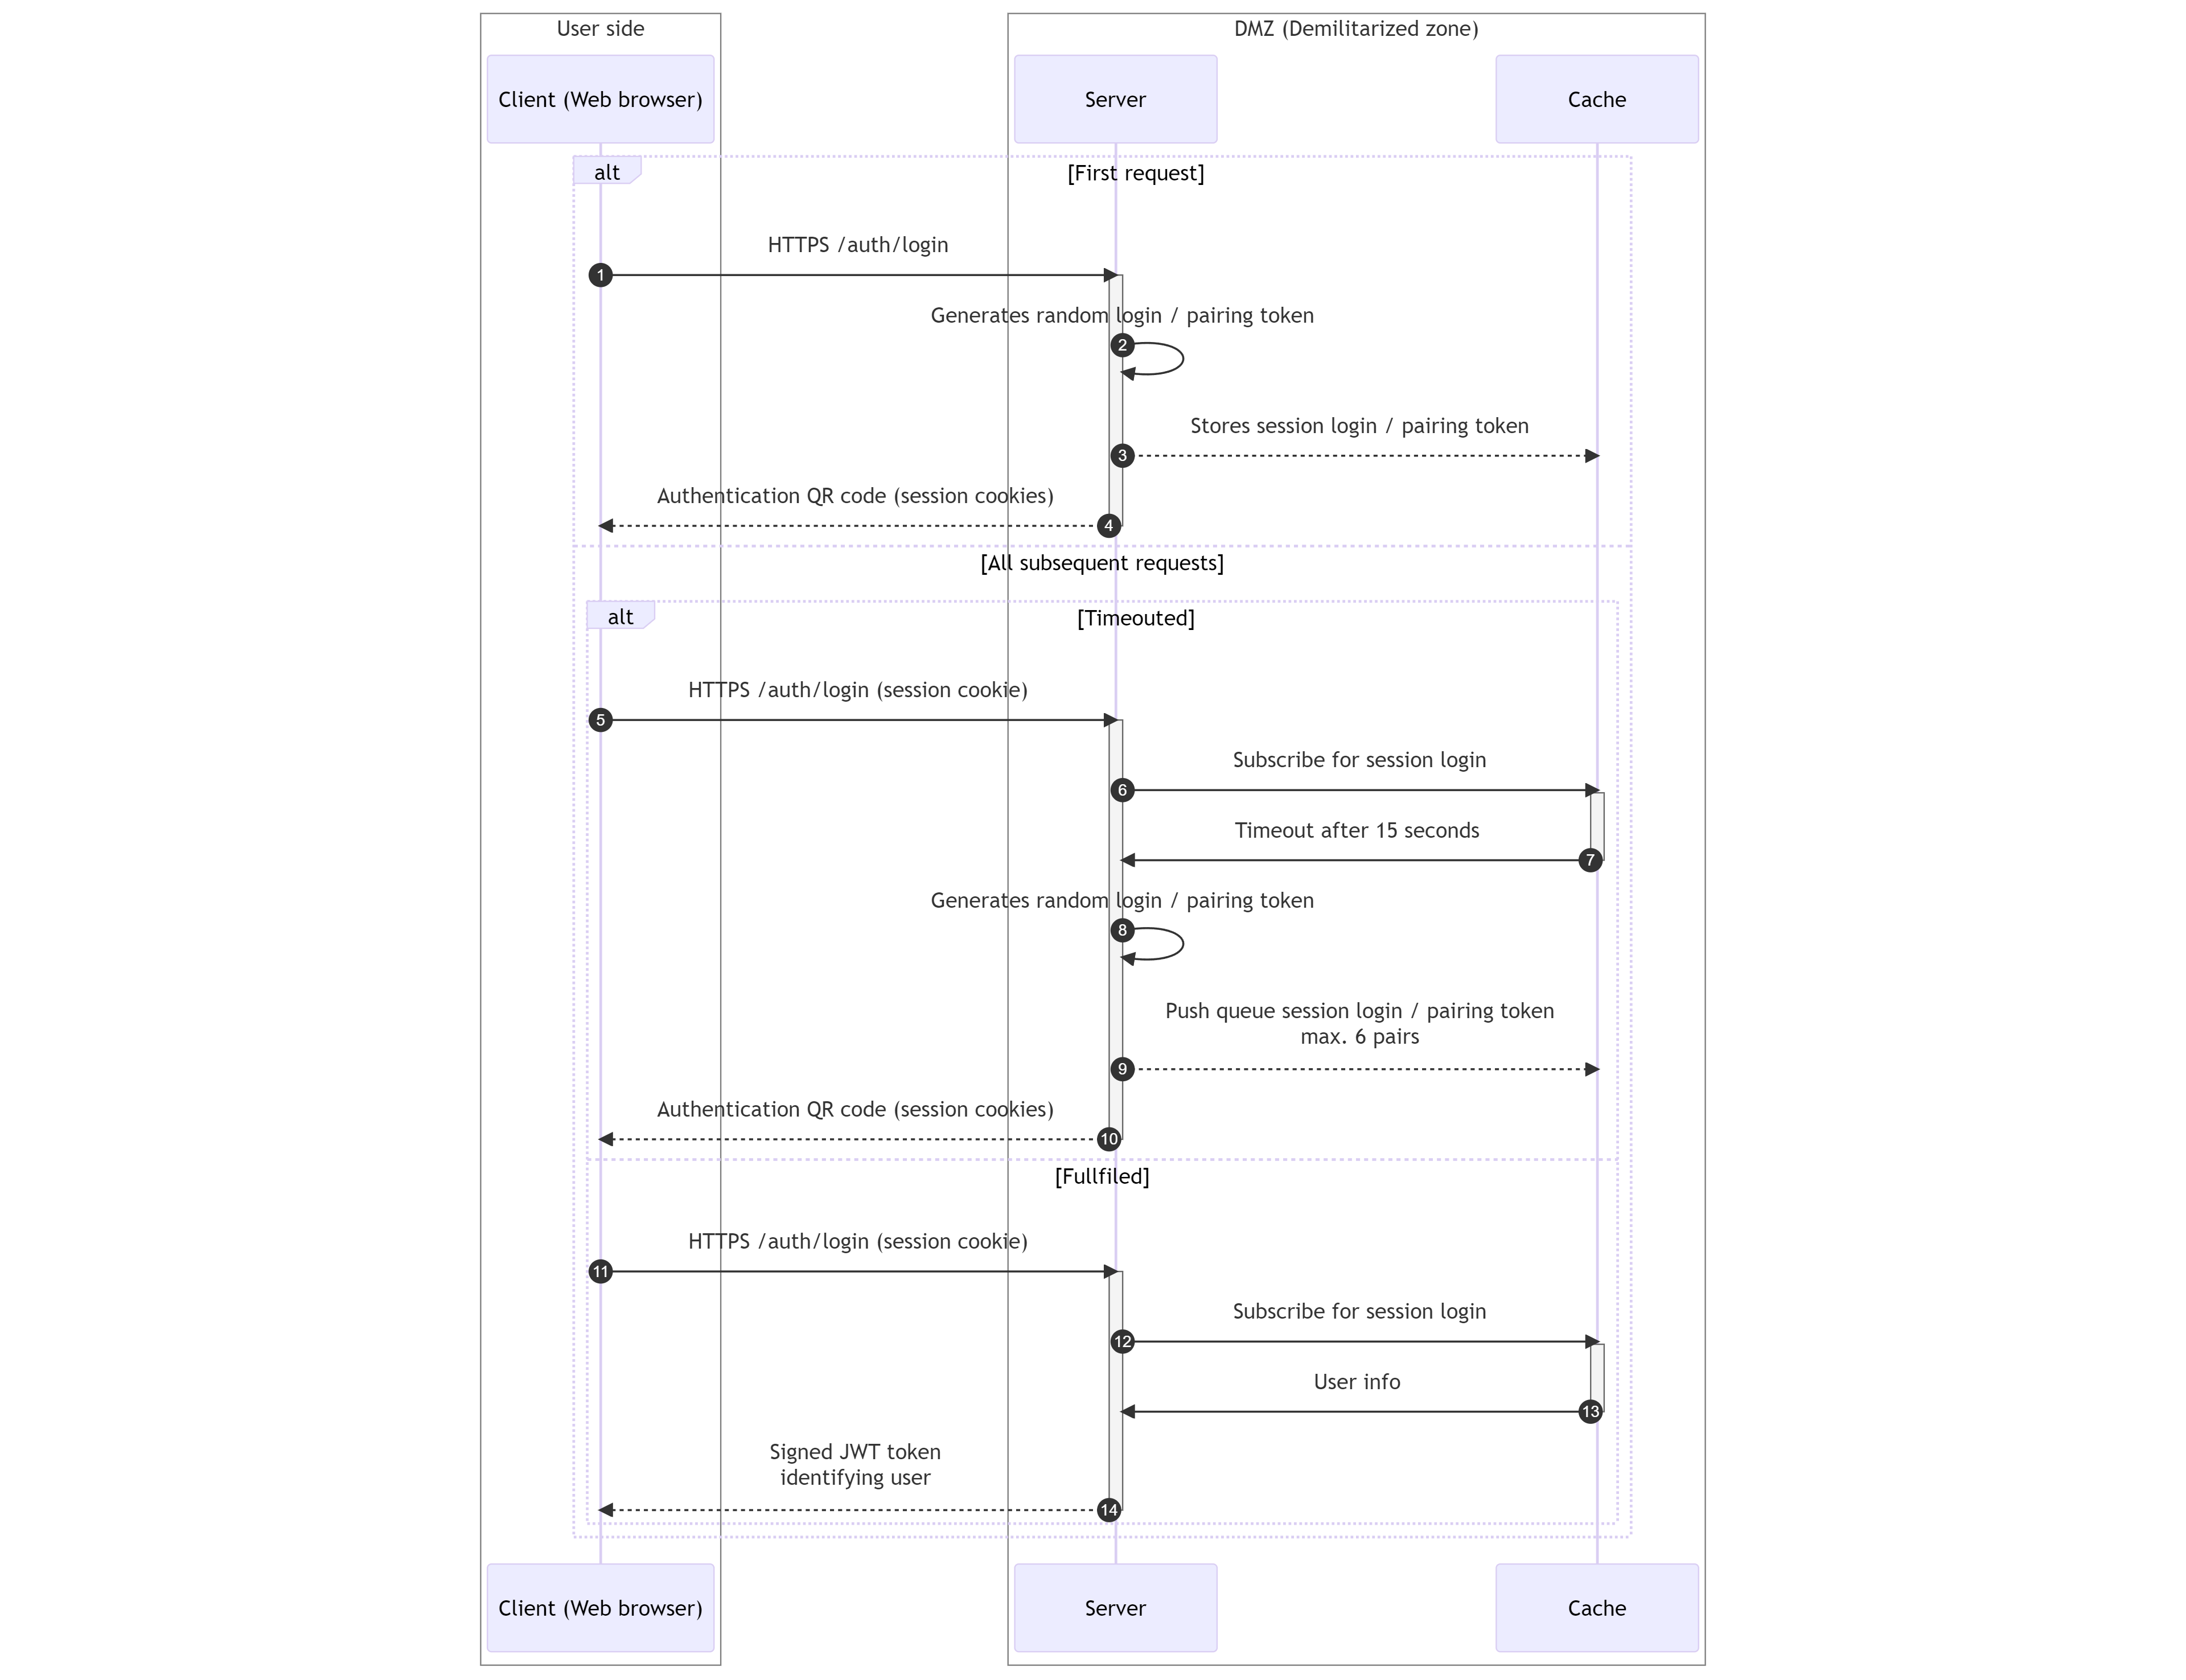
- Each client (Dashboard or any WebSDK component) makes a request to
/auth/loginserver's REST API endpoint over secured HTTPS connection in order to log in the user. - Server generates unique random authentication and pairing tokens. Tokens are random 64-bit unsigned integers.
- Server stores generated tokens in the memory cache with 15 seconds validity under session ID generated for the client.
- Server generates authentication QR code containing companyID, clientID, authenticationToken and pairingToken and sends it back to the client. Session information is also sent back to the client as cookie.
Authentication not-fulfilled / timeout
- Client makes subsequent requests to
/auth/loginserver's REST API endpoint now with session information stored in the cookie. - Server subscribe to cache events and waits for user successful authentication. Server waits for 15 seconds for subscription to be triggered.
- Request times out after 15 seconds
- Server generate new authentication and pairing tokens
- Server push generated token pair to memory cache under client session ID. Maximum number of token pairs stored per session is 6. Token cache acts as a FIFO queue. In case cache already contains 6 token pairs, the oldest one is removed and replaced with the new one, thus invalidating the oldest authentication QR code.
- Server generates new authentication QR code containing companyID, clientID, authenticationToken and pairingToken and sends it back to the client.
Authentication fulfilled
- Client makes subsequent requests to
/auth/loginserver's REST API endpoint now with session information stored in the cookie. - Server subscribe to cache events and waits for user successful authentication. Server waits for 15 seconds for subscription to be triggered.
- Authentication is successful and resulting user information in form of facade signed JWT is published via cache to subscribed server request.
- Server forwards JWT back to the client as response to the
/auth/loginin HTTPS only secured cookie for further authorization during the session.
Authenticating user to Dashboard / WebSDK
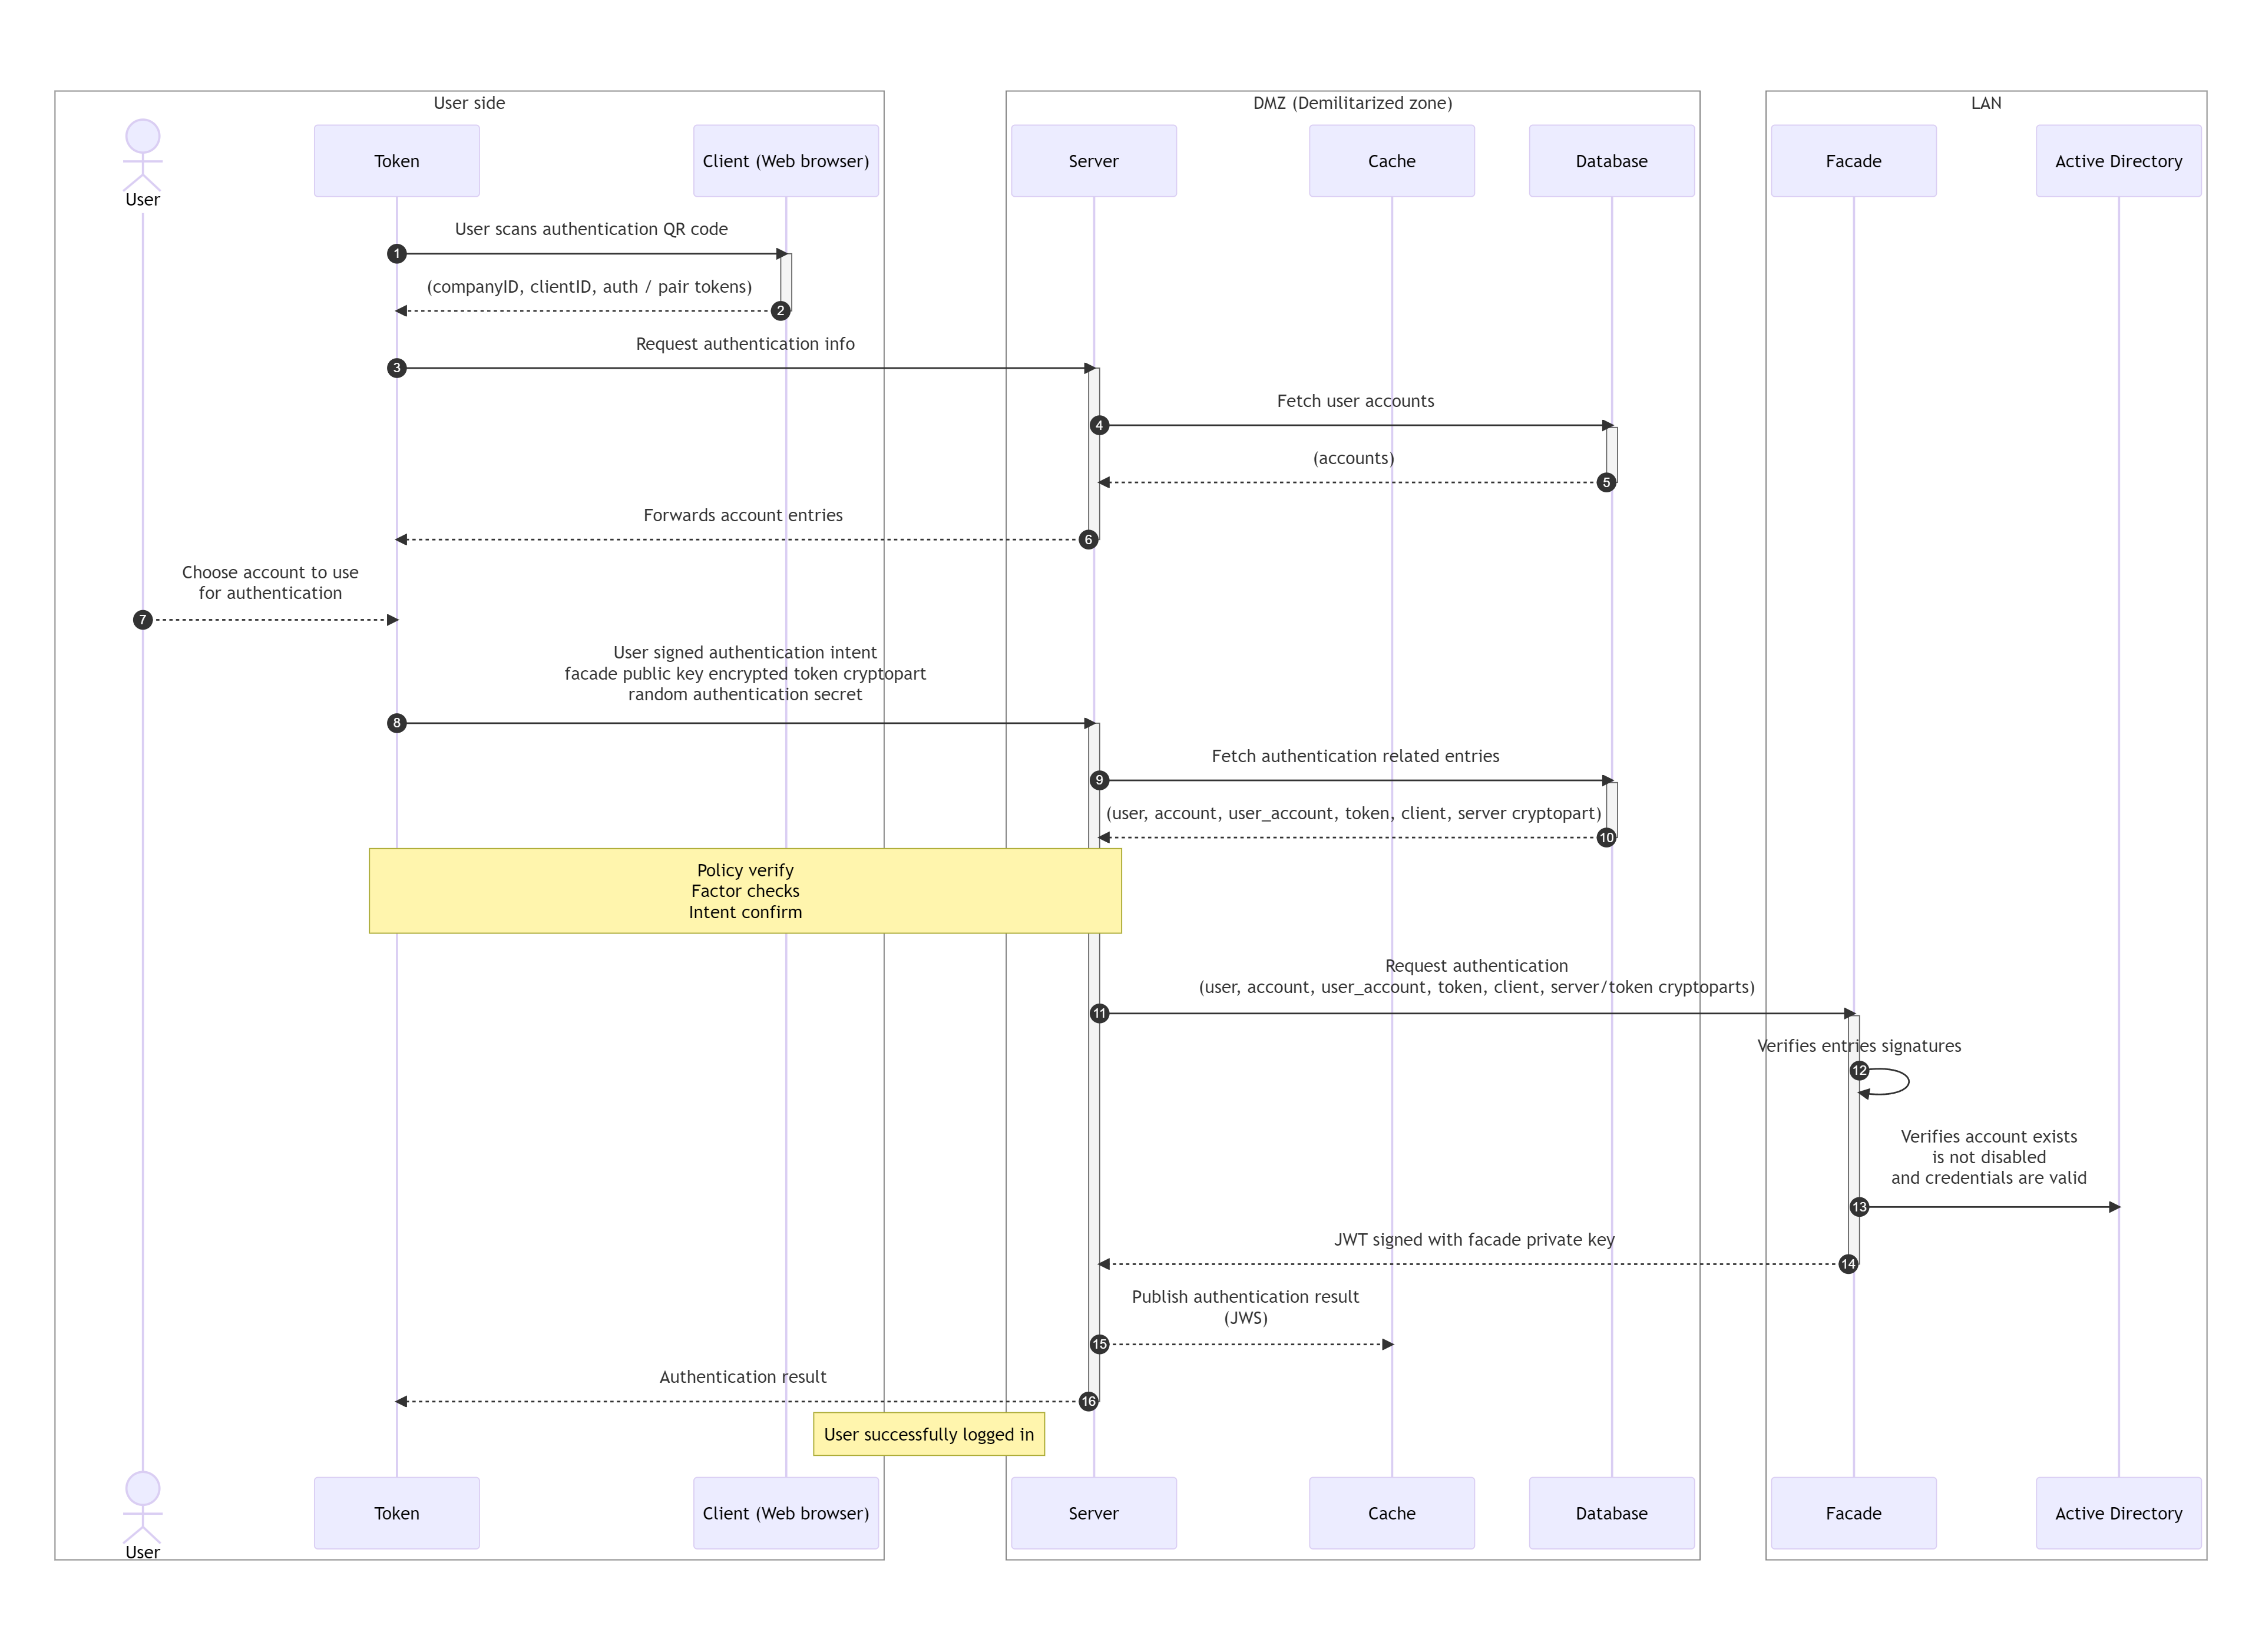
- User using his registered token scans the generated authentication QR code from the web browser screen.
- Token decodes scanned QR code. Authentication QR code contains companyID, clientID, authenticationToken and pairingToken.
- Token requests authentication from server.
- By connected token and its unique ID, server fetches user entry token belongs to with associated accounts from the database.
- Database returns user and accounts entries to the server.
- Server forwards account entries to the token.
- User selects account he wishes to use for authentication. This applies only in case that client, user is about to login to, is WebSDK component and account credentials needs to be passed into target authentication subsystem. In case of Dashboard, first account is automatically selected just to preserve used crypto scheme. In order to login to dashboard, no account is needed.
-
Token creates authentication intent signed with user private key and sends it to the server. Token also sends token crypto part encrypted with facade public key and authentication secret (random 64-bit unsigned integer), which is AES encrypted with pairing token, to the server. Authentication intent contains following information:
Authentication Intent Value Description tokenID uint64 User unique token identifier userID uint64 Unique user identifier accountID uint64 Selected account ID action string "authentication" actionToken uint64 Authentication token targetID uint64 Client ID targetSignature string User signed Client DB entry timestamp uint64 Current timestamp signature string Authentication intent user signature -
Server fetches all authentication related database entries from the database.
- Database returns user, account, user_account, token and client database entries along with server crypto part, which was encrypted with facade public key during registration process.
- Server verifies received user, account, user_account, token and client database entries signatures and requests authentication from the facade. Along with all database entries also server and token crypto part are sent to the facade.
- Facade verifies received user, account, user_account, token and client database entries signatures with its private key. Verifies authentication intent signature with user public key stored in user database entry. Verifies target signature is valid signature of client database entry signed with user private key and also verifies targetID in authentication intent is equal to clientID from client database entry.
- Facade decrypts both received server and token crypto parts using its facade private key and XORs them together to get password for the account. Verifies that the user exists in Active Directory, authenticates their credentials, and checks to ensure the user account is not disabled.
- After successful verification, JWT token with user information is created and signed with facade private key. JWS is then sent back to the server.
- Server looks up the authentication token in its cache and publishes received JWT token to the client via cache as described in Authentication fulfilled.
- Server propagates authentication result to the token.
Authentication (PC client)
Before authentication to users PC can be performed, user must be registered as described in Registration.
Registered tokens automatically connect to the server over mutually authenticated TLS WebSocket connection using certificates obtained during registration as described in Client TLS certificate initialization.
PC client authentication QR code generation
Generating authentication QR codes on user PC is much simpler than in case of Dashboard or WebSDK. The only requirement is to have Excalibur Client application installed on the PC. Excalibur Client application is used to generate authentication QR code containing companyID, clientID, authenticationToken and pairingToken and display it on the screen. Authentication QR code is generated every 15 seconds, with 90 seconds validity. Like in case of Dashboard or WebSDK, authentication and pairing tokens are random 64-bit unsigned integers.
The reason why in this case authentication QR code is generated on the PC and not obtained from the server is that the PC also has to support offline scenario where the server is not available. In this case, the client is able to generate authentication QR code on its own and perform authentication with the Token even without the server.
Authenticating user to PC client
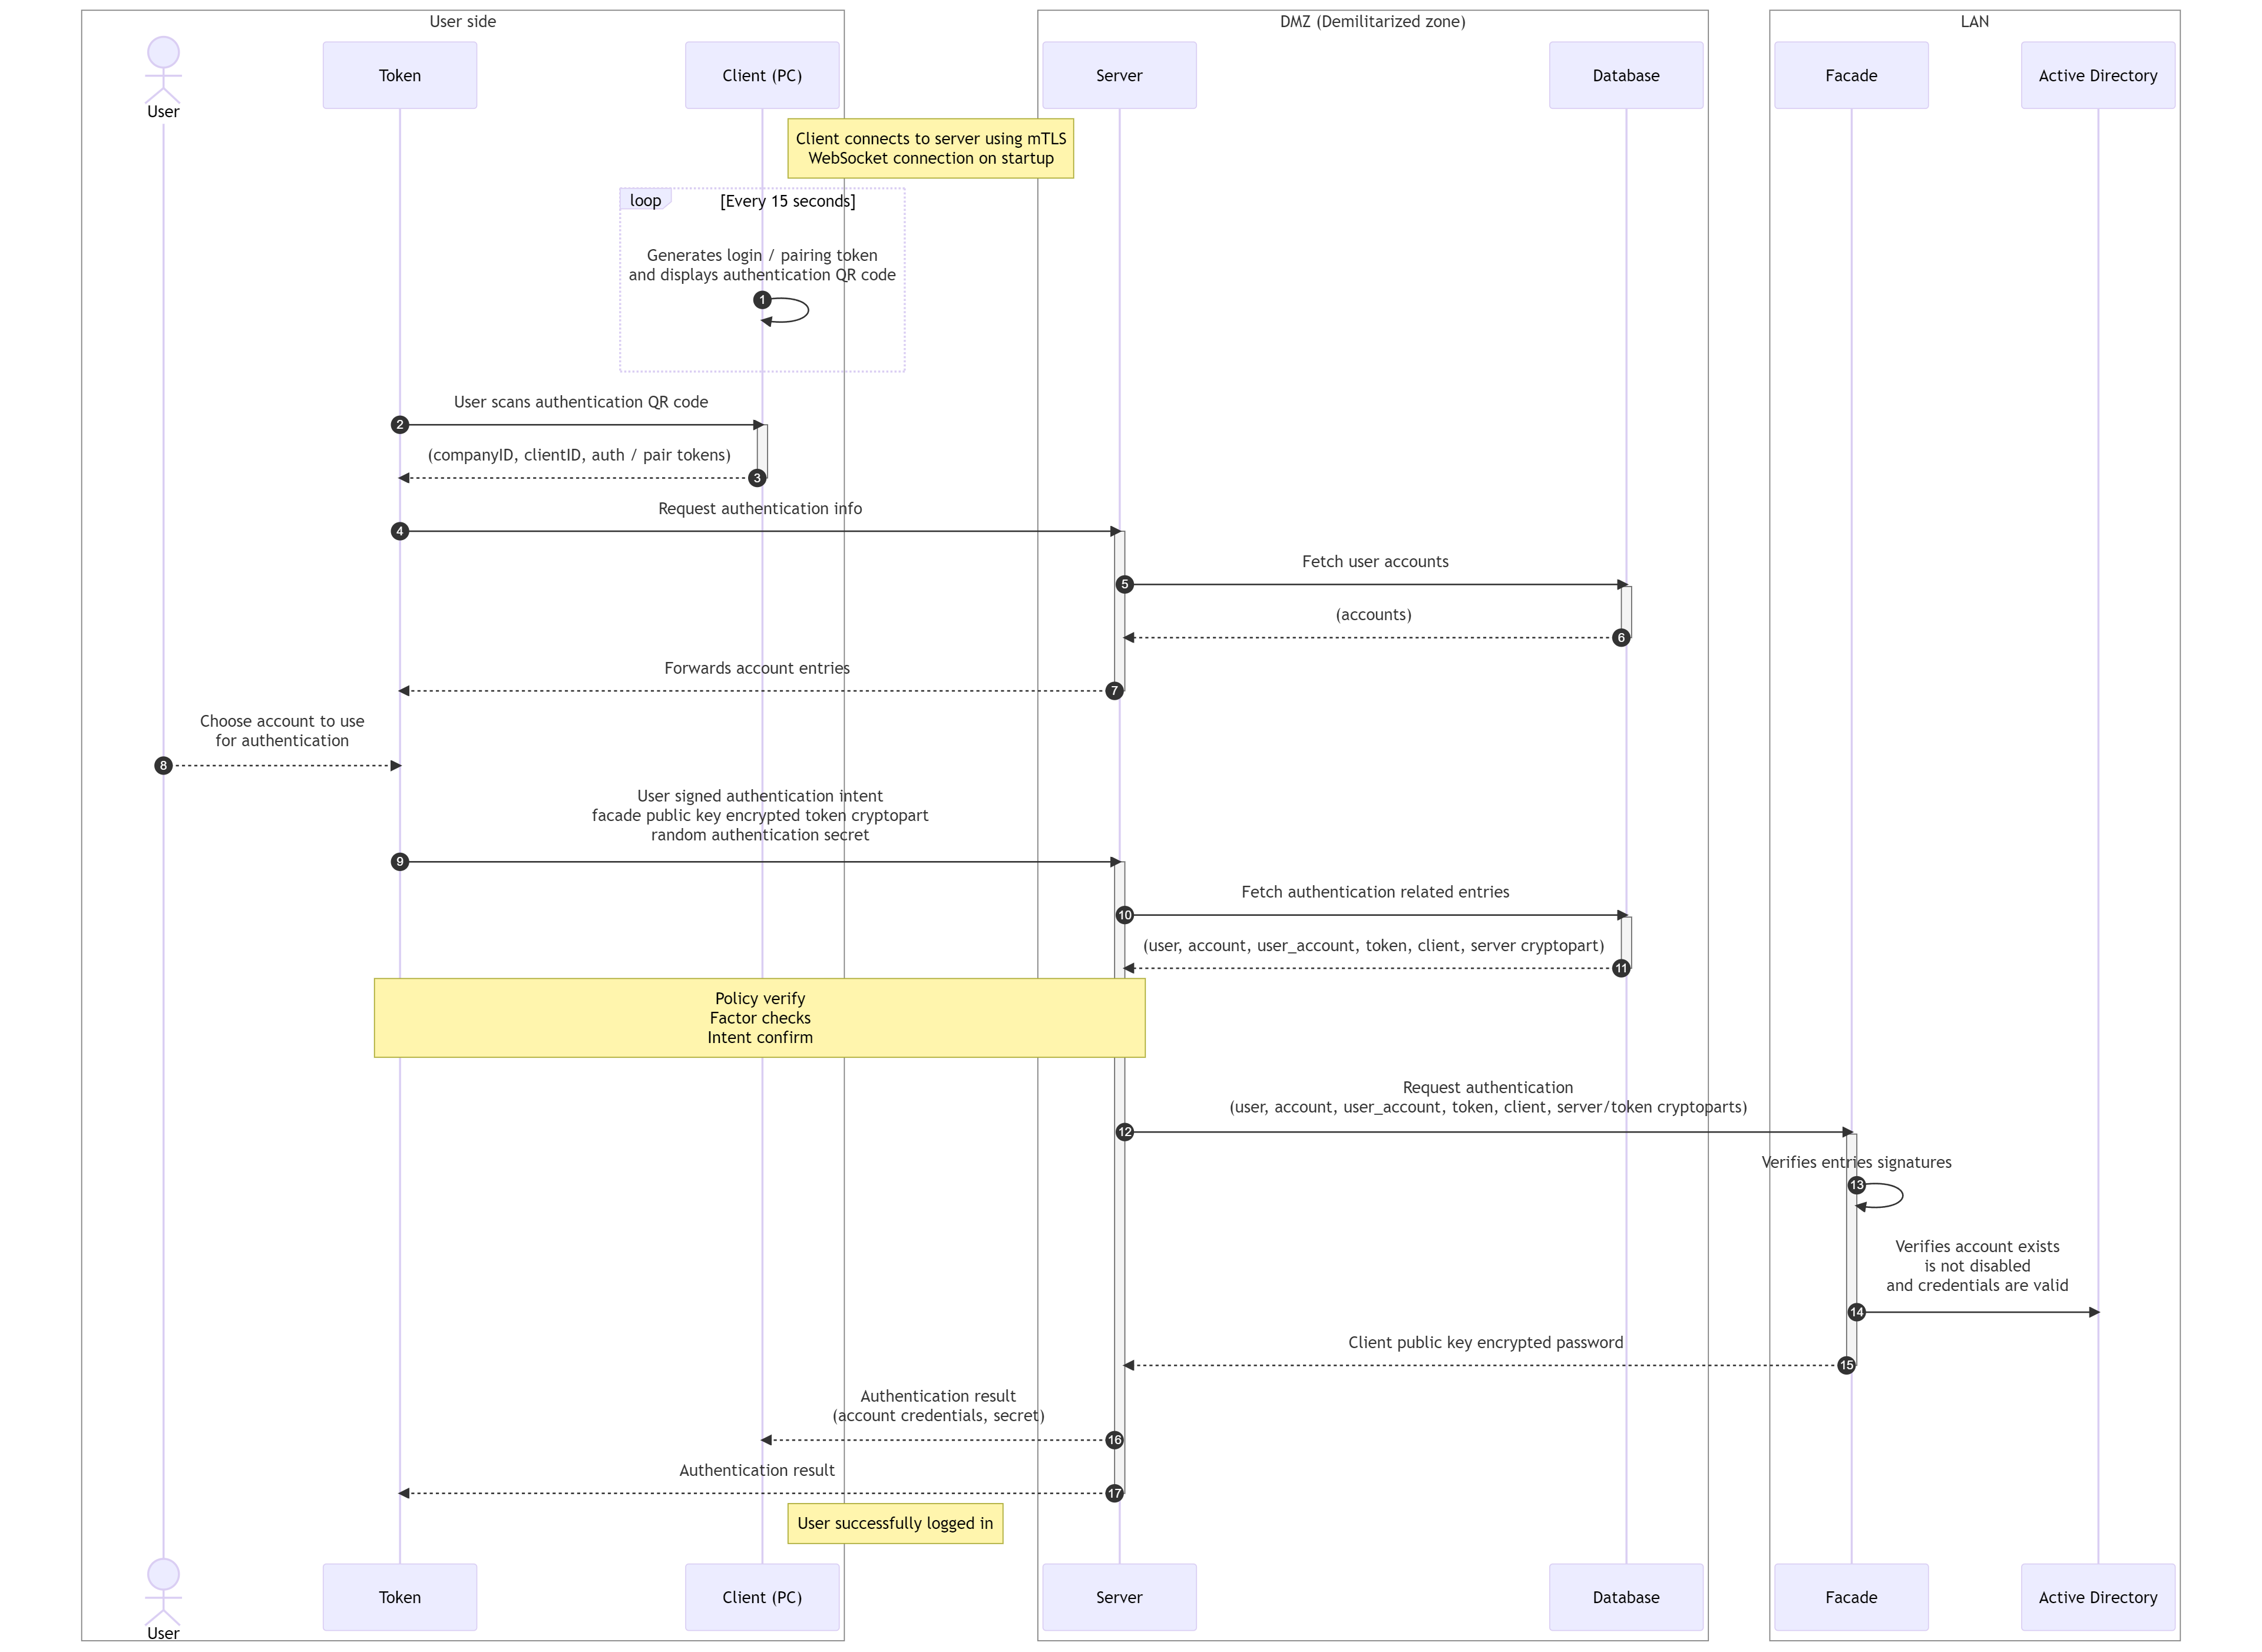
- Each client PC client periodically generates authentication QR code containing companyID, clientID, authenticationToken and pairingToken and displays it on the screen. Authentication QR code is generated every 15 seconds, with 90 seconds validity. Like in case of Dashboard or WebSDK, authentication and pairing tokens are random 64-bit unsigned integers.
- User using his Token scans the generated authentication QR code from the client screen.
- Token decodes scanned QR code. Authentication QR code contains companyID, clientID, authenticationToken and pairingToken.
- Token requests authentication from server.
- Based on connected token and its ID, server fetches user entry, token belongs to and also user associated account entries from the database.
- Database returns user and accounts entries to the server.
- Server forwards accounts entries to the Token.
- User selects account he wishes to use for authentication (optional feature).
- Token creates authentication intent and sends it to the server. Intent is signed with user private key.
- Token also sends token crypto part encrypted with facade public key and authentication secret (random 64-bit unsigned integer) AES encrypted with pairing token to the server.
- Server fetches all authentication related database entries from the database.
- Database returns user, account, user_account, token and client database entries along with server crypto part, which is encrypted with facade public key.
- Server verifies received user, account, user_account, token and client database entries signatures and requests authentication from the facade. Along with all database entries also server and token crypto part are sent to the facade.
- Facade verifies received user, account, user_account, token and client database entries signatures with its private key. Verifies authentication intent signature with user public key stored in user database entry. Verifies target signature is valid signature of client database entry signed with user private key and also verifies targetID in authentication intent is equal to clientID from client database entry.
- Facade verifies user exists in Active Directory, verifies his credentials and checks if user is not disabled.
- After successful verification, facade decrypts both received server and token crypto parts using its facade private key and XORs them together to get password for the account. Password is then encrypted with client public key and sent back to the server.
- Server forwards all authentication related database entries, password encrypted with client public key and authentication secret to the client.
- Client looks up the pairing token in its queue of 6 authentication / pairing token pairs by authentication token received in signed authentication intent. Uses pairing token to AES decrypt received authentication secret. Secret is then stored in encrypted local storage under user ID. This secret is used to perform offline (OTP) authentication in case server is not available. For offline authentication to work, successful online authentication must be performed first.
- Client as every other Excalibur component verifies received database entries signatures, on success decrypts received password with its private key and injects credentials into OS authentication subsystem.
Authenticating user to PC client (offline)
In case PC client or token is not connected to the server for some reason, Excalibur supports offline authentication using OTP. OTP is generated by the Token using authentication secret obtained during online authentication and needs to be entered by the user into the PC client.
Offline authentication is configurable feature and can be disabled via security policies.
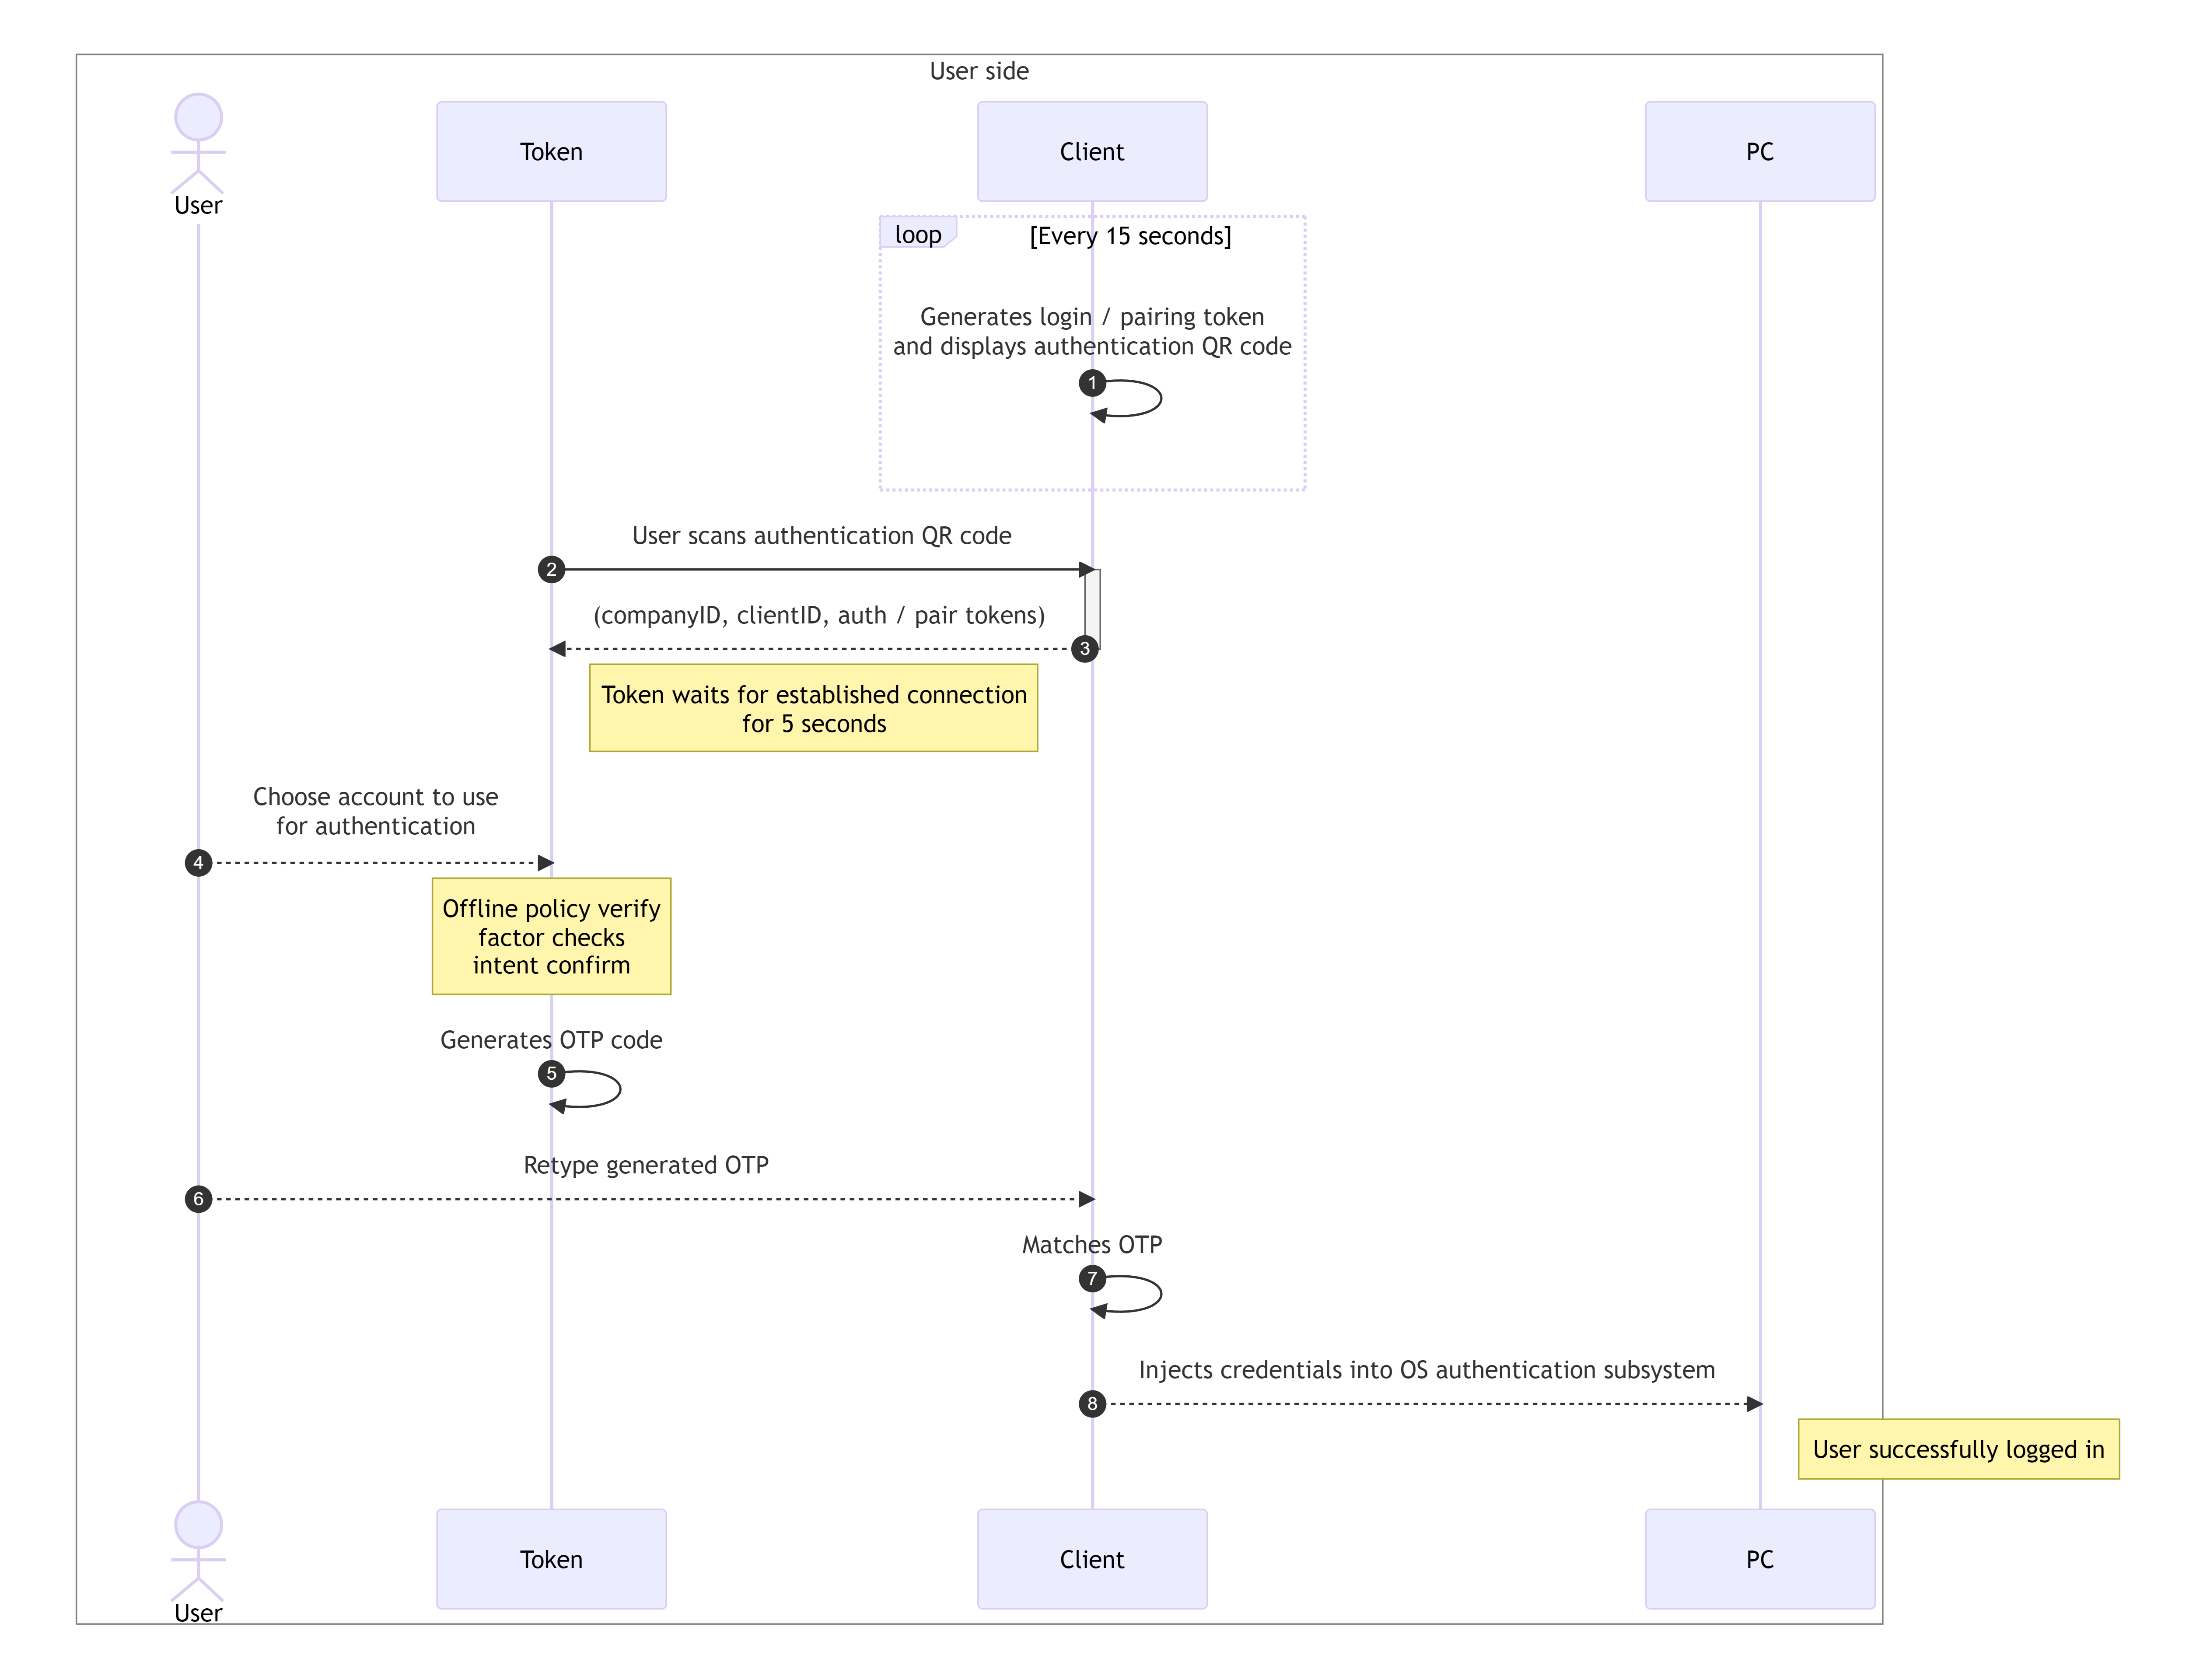
- Like in case of online authentication, each PC client generates authentication QR code even when connection to server cannot be established. Authentication QR code contains companyID, clientID, authenticationToken and pairingToken and is displayed on computer screen. Like in all cases above, authentication and pairing tokens are random 64-bit unsigned integers.
- User using his Token scans the generated authentication QR code from the client screen.
- Token decodes scanned QR code. Authentication QR code contains companyID, clientID, authenticationToken and pairingToken. Every Pairing token also contains required OTP code length. Length of OTP code is function of number of user, which uses the same PC and number of failed OTP attempts.
- If connection to server is not established, token waits for connection 5 seconds and then starts offline authentication process. Asks user to choose account he wishes to use for authentication. In case only one account is registered, it is automatically selected. After this step, authentication process is the same as in case of online authentication, but policies verification, factor checks and intent confirmation is done locally on the token against cached data during online authentication.
- In case of successful authentication, token generates OTP code of required length and displays it on the screen. OTP code is generated as follows. Selected account ID is XORed with stored authentication secret and result is XORed again with authentication token. Resulting value is then shortened and base 60 encoded for better readability. OTP code is then displayed on token screen.
- User enters displayed OTP code into the client and submits authentication.
- As described in Authenticating user to PC client, client during online authentication stores account credentials in its secure local storage. After OTP is entered, client iterates over all stored credentials and all generated authentication / pairing token pairs and generates OTP codes same way as token. In case no match is found, client remembers failed OTP attempt and increases retry timeout, before entering OTP code again. This failed attempts also increases the length of OTP code, which is generated by the token. Failed attempts are remembered in hour intervals, and are reset after 24 hours.
- If generated OTP code matches entered OTP code, client decrypts account password stored in its secure local storage and injects credentials into OS authentication subsystem and user is logged in.
Dynamic Passwords
When Dynamic passwords are enabled, the user passwords are changed automatically after the last active session is terminated, effectively creating a system using random One-Time Passwords (OTPs). While there are parallel sessions of a single user on different devices, the password for that user cannot be changed to avoid SSO-related complications.
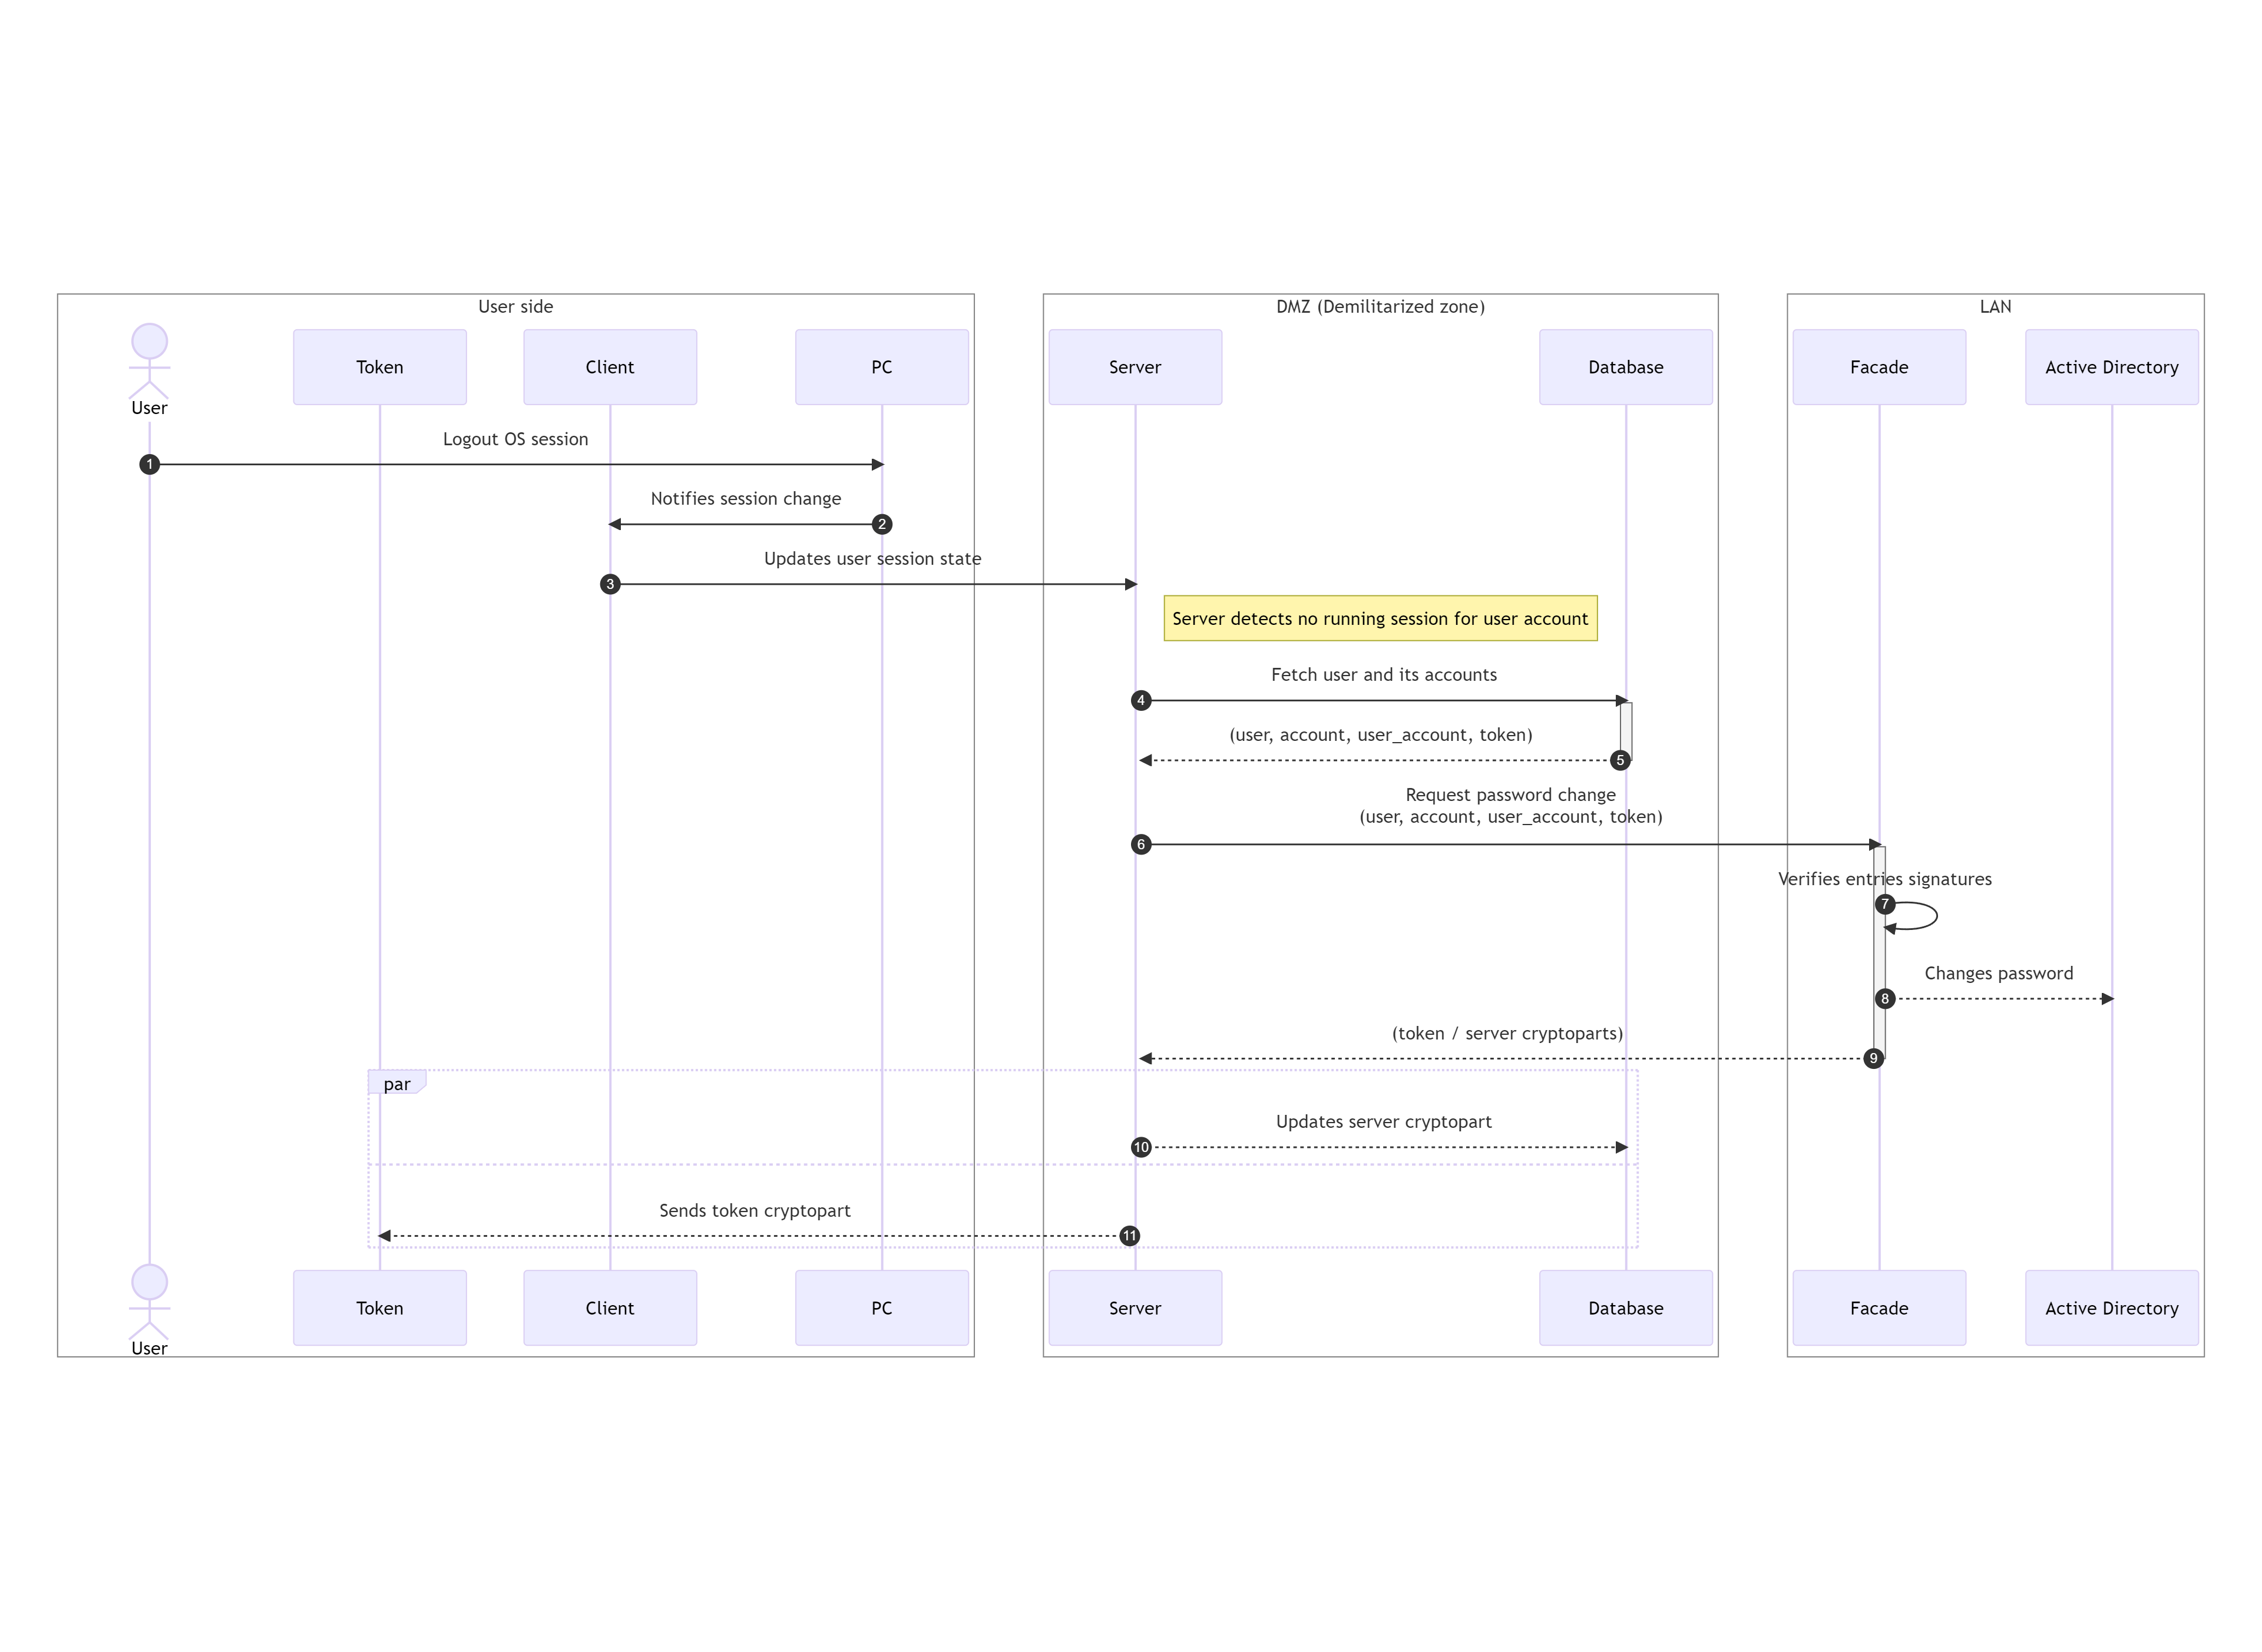
- User terminates / logout their OS session.
- Client service application gets notified from the OS about the session termination.
- Client notifies the server about the session termination by propagating its current state.
- Server detects no more active sessions for the user and fetches user related database entries from the database.
- Database returns user, account, user_account and token database entries to the server.
- Server verifies received entries and requests password change from the facade.
- Facade verifies received user, account, user_account and token database entries signatures with its private key.
- Facade generates new random password. Generated password follows password policy defined in Active Directory and requirements for its complexity are validated with
NetValidatePasswordPolicy()API (Password policy cannot be configured in Excalibur and is always inherited from Active Directory in order to prevent policy violation / mismatch between the both systems). Password is then XORed with a randomly generated server crypto part. Token crypto part is calculated as XOR of server crypto part and password. Password for the account is then changed by the facade directly in Active Directory, token crypto part is encrypted with user public key and server crypto part is encrypted with facade private key. - Facade both server and token crypto parts are sent to the server.
- Server updates server crypto part in database
- Server sends encrypted token crypto part to the token. Token decrypts crypto part with its user private key and stores it securely in its secure storage. In case token connection is not established, crypto part is cached in database until next token connection, when it gets synchronized.
Authorization
Every Excalibur Authorization is push notification based, for example, VPN-login where username needs to be entered will trigger a push notification to the Token of the User specified by the username. On the Token, the User is asked to confirm the given action with the exact specification of what is being confirmed and authentication factors are requested. RADIUS is the primary use case of Excalibur Authorization. In these cases, no password is reconstructed as no password is required.
- Authorization starts by any supported component (for example RADIUS integration component) requesting access on behalf of User’s account. Facade receives the authorization request, generates authorizationToken and forwards it together with account and component info to the Server.
- Server fetches accountID for the account, componentID for the component, verifies authorization request of the component, compares it against policy and sends authorizationToken, accountID and component entry to the Token via Push message or via TLS connection if the Token is currently connected.
- Token receives the authorization request and displays Authorization dialog (containing Account and Component information) for the User with Cancel and Confirm options. After confirming Token generates Authorization Intent, sings it with userCompanyPrivateKey and sends it to the Server.
| Authorization Intent | Value | Description |
|---|---|---|
| tokenID | uint64 | tokenID generated by the Server |
| userID | uint64 | userID from userCompany certificate |
| accountID | uint64 | selected accountID |
| action | string | “authorization” |
| actionToken | uint64 | authorizationToken |
| targetID | uint64 | componentID |
| targetSignature | string | userCompany Signature of the Component entry |
| timestamp | uint64 | current timestamp |
| signature | string | userCompany Signature of the authentication intent |
- Server then verifies the Authorization Intent, performs factors verification against matching authorization policy and if successful forwards verified Authorization Intent to the Facade.
- Facade again verifies the intent and then sends Access-Granted reply to the Component.
Supported components can also communicate with the Server instead of Facade. In that case, some steps in the flow change as follows:
- Authorization starts by any supported component (for example RADIUS integration component) requesting access on behalf of User’s account. Server receives the authorization request, generates authorizationToken, associates it with received account and component info, and proceeds with the regular step 2.
- Facade again verifies the intent and then sends Access-Granted reply to the Server.
- Server forwards Access-Granted to the Component.
RSA SecurID is just a specific variation of this scheme where Excalibur AD Facade acts as a RADIUS client and communicates utilizing the RADIUS protocol with RSA SecureID server acting as a RADIUS server. As part of the authorization a dialog is opened asking the user to enter the OTP token from the RSA HW token which is then checked via Excalibur AD Facade against the RSA SecureID server.
Verification
Verification is a special action where the User (Verifier) is confirming another User's’ (Initiator) identity directly from his mobile phone, either by scanning a QR code of the initiator phone or by receiving a push notification or using the Management Dashboard. Verification can be configured as a required action for every policy violation, it can be used for PIN reset, registration or login with policy violation. The verifier confirms the action using his authentication factors and signs the action with his signature. Every policy change is also understood as verification of the change by an Admin.
-
Verification starts by a) making any relevant changes via Excalibur Dashboard (setting new policies, creating geofences, allowing access for User) or b) by some User performing action (on Initiator’s token) which is not allowed without further verification (Verification request might be sent to manager or Service desk operator via push message or TLS connection) or c) by scanning verification QR by verifier. Server creates Verification DB entry containing the data which is to be verified (policyID, userID - initiator) and sends it with signed related entries (User entry, Policy Entry) to Verifier’s token.
Verification DB Entry Value Description verificationID uint64 verificationID generated by the Server.
...Each entryID related to verification:
policyID,
userID,
violation,
etc...timestamp uint64 current timestamp signature string Server Signature of the Verification DB Entry -
Verifier’s token verifies (signature of) each related entry and then displays the content of verification (information about user, details regarding the policy and action which is to be performed) and asks for user’s confirmation. When confirmed, Verifier’s token generates verification intent, signs it and any updated DB entry with its userCompanyPrivateKey, and sends it to the Server.
Verification Intent Value Description tokenID uint64 tokenID generated by the Server userID uint64 userID from userCompany certificate accountID uint64 0 action string “verification” actionToken uint64 verificationToken targetID uint64 verificationID targetSignature string userCompany Signature of the Verification DB entry timestamp uint64 current timestamp signature string userCompany Signature of the authentication intent -
Server then verifies the verification intent, performs factors verification against matching authentication policy and it verifies the action of the Initiator or updates the DB entry.

Factor reset
Registered Users have an option to reset their authentication factors on their Tokens. Firstly, authentication factors are verified based on the security policy and if it succeeds, User proceeds to set new factors.
-
User begins the factor reset procedure by clicking “Factor reset” button in his registered Token. Token then generates Factor Reset Intent and sends it together with factorType to the Server.
Factor reset Intent Value Description tokenID uint64 tokenID generated by the Server userID uint64 userID from userCompany certificate accountID uint64 0 action string “reset” actionToken uint64 flowID targetID uint64 tokenID targetSignature string userCompany Signature of the Token DB entry timestamp uint64 current timestamp signature string userCompany Signature of the factor reset intent -
Server verifies the factor reset intent, performs factors verification against matching factor reset policy and if successful, asks a token to set up a new factor.
- After the user provides a new factor (PIN,Fingerprint) Token generates privateKey, publicKey pairs for the factor using HW-backed secure enclave. PublicKey is then signed by Token with userCompanyPrivateKey and sent to the Server.
- Server verifies the signature and stores the publicKey for updated factor.